
A caulk gun is a useful tool for applying sealant that helps prevent moisture from entering cracks and gaps in your walls. People often think home maintenance tasks look too complex or messy. You can achieve fantastic results on your very first try by following simple rules. This guide teaches you everything about your tool and your technique.
1. What Is a Caulk Gun and How Does It Work?
Let’s study the tool before starting the work. This knowledge keeps your work smooth and protects your wallet from costly accidents.
What Exactly Is a Caulk Gun? (Definition & Purpose)
A caulk gun is a metal or plastic frame that holds a tube of thick sealant. People use it to cover small joints and prevent the entry of water into the cracks. The most prominent purpose of this tool is to create a barrier.
How a Caulk Gun Works
You have to press a lever on the handle. This manual pressure triggers a long metal rod that pushes the plunger inside the tube forward. The internal force drives the thick compound out of the tip.
Sealant Gun vs Caulking Gun: What’s the Difference?
You must have heard both terms, and you feel baffled. Don’t worry. A sealant gun and a caulking gun are the same thing. While some people refer to it as a sealant gun, the term 'caulking gun' is more widely used in both British and American English.
Common Projects You Can Do with a Caulk Gun
You will find endless uses for this tool when you discover when to use a caulking gun around your home. Small gaps appear everywhere as buildings age over time.
- Sealing gaps around windows and wooden baseboards
- Attaching a backsplash
- Filling empty spaces above cabinets
- Completing custom DIY paneling work and creative IKEA furniture hacks
2. Types of Caulk Guns: Manual vs Dripless vs Cordless
Your selection of the tool will change the physical effort you need. There are multiple models suitable for different people.
Manual Smooth Rod Caulk Guns
This is the most affordable model people find in local hardware stores. It uses friction to slide the rod forward whenever you squeeze your fingers. You must press a small catch by hand to halt the flow.
Manual Ratcheting Caulk Guns
These older models use a notched metal rod that clicks loudly during use. They require high hand strength because the rod moves in rigid steps. You must twist the rod to disengage the ratchet mechanism and release the rod pressure.
Dripless Caulk Guns
Dripless frames feature an automatic spring mechanism that relieves internal tension. The rod stops pushing the moment you release your grip on the handle. This design keeps your floors clean.
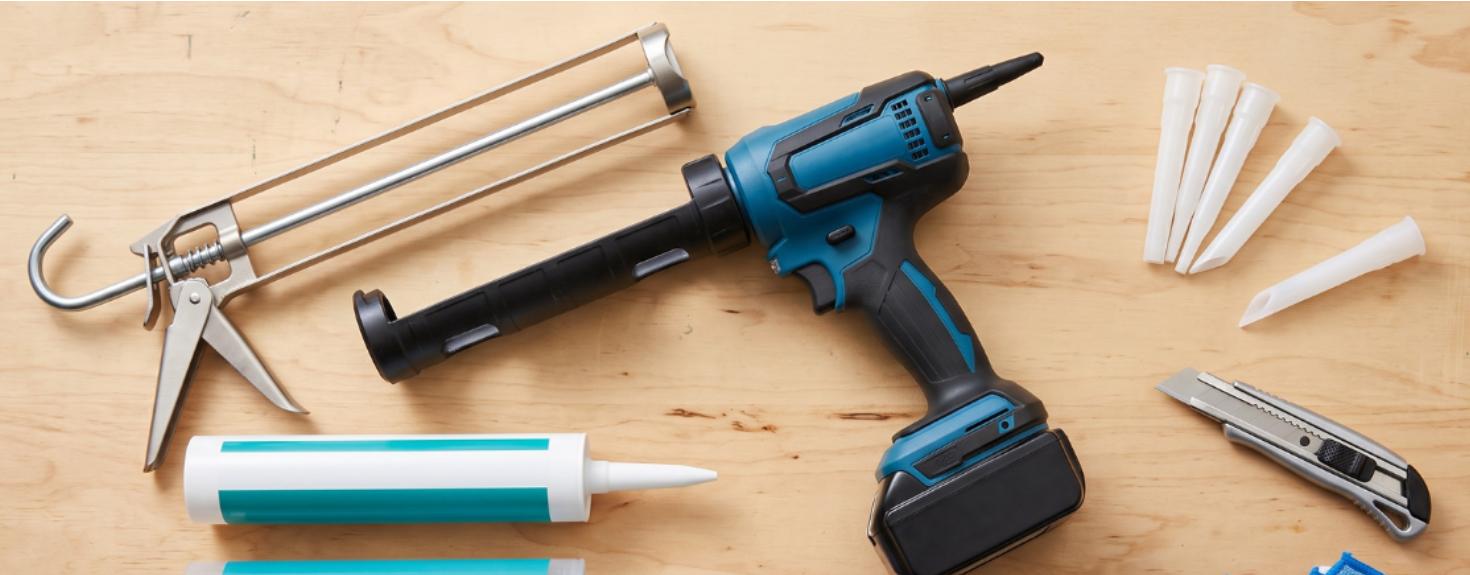
Cordless Electric Caulk Guns
A cordless electric caulking gun uses battery power to automate your heavy work. Brands like ONEVAN create these tools to eliminate severe hand fatigue during large assignments. You simply pull the trigger and watch the motor generate uniform lines.
Sausage Caulk Guns (Bulk Application)
Professionals use sausage guns to apply massive amounts of sealant on commercial properties. They have a long metal cylinder that has foil packages.
How to Choose a Suitable Caulk Gun for Your Project
You have to purchase a tool that is suitable for the work you want it for. Use this helpful chart to select the best model for your hands:
|
Project Size |
Best Tool Option |
Primary Benefit |
|
Minor home patches |
Manual or Dripless Gun |
Very low price and easy to store |
|
Large renovations |
Stops your muscles from cramping |
|
|
Industrial job sites |
Sausage Caulk Gun |
Holds massive amounts of material |
3. How to Use a Caulk Gun: Step-by-Step Instructions
Home repairs are not an easy job. You have to set aside some time and get all the tools before you start.
Step 1: Prepare Your Tools and Work Area
Collect all the tools and clean the area with rubbing alcohol.
- Your caulk gun and a fresh tube of paste
- A utility knife and a custom caulk smoother tool
- Clean painter’s tape and a damp rag
Apply two rows of painter’s tape directly along the edges of the open crack. This technique protects your tiles.
Step 2: Cut the Nozzle at the Right Angle
Cut the plastic tip at a 45-degree angle with your utility knife. A tiny cut near the top produces a thin line. A deeper cut further down the cone creates a much thicker line. You should match the diameter of the cut to the actual size of your gap.
Look directly into the cut opening to check for a hidden foil barrier. You must push a long wire deep into the tip to pierce this inner seal. Skipping this simple chore represents the number one mistake beginners make.
Step 3: Load the Caulk Tube into the Gun
For many users, loading a caulk gun can be accomplished quickly, often in less than ten seconds, but beginners may take a bit longer to get accustomed to the process. Press the small metal release catch on the back of the device with your thumb.
Pull the long metal rod all the way back while holding the catch down. Drop your container into the open cradle with the plastic nozzle pointing forward. Push the rod forward.
Step 4: Apply Caulk with the Right Technique
Hold your tool against the seam. Place the angled opening of your plastic tip flat against the starting point of the crack. Press the trigger slowly and move your arm forward.
You can choose whether you want to push or pull your device along the line. Whether you should push or pull a caulk gun divides many local handymen. Pulling the tool toward your body works best because it forces material deep inside the gap. Pushing is acceptable for beginners who need to see the line clearly.
Step 5: Smooth the Bead for a Professional Finish
You have to smooth out the wet compound immediately after drawing your line. Drag your caulk smoother tool or a wet finger down the center of the bead. Pull the tape away at an angle to create crisp, flawless edges.
Step 6: Clean Up and Store Your Caulk Gun
Wipe the stray smudges with a cloth. You will need a metal blade or solvent to scratch away patches that harden completely.
Extract the tube from the frame by pulling back the main rod. Wrap a piece of tape over the tip.
4. How to Use a Caulking Gun for the First Time (Beginner Guide)
It looks difficult, but it is not. You can eliminate your anxiety by practicing on scrap items before touching your walls.
Why You Should Practice Before Your First Real Project
Always use a caulking gun for the first time on spare cardboard. Find an old delivery box. Press the handle to see how much pressure it demands to move the rod. This test build forms the physical coordination you need for your living room.
Mistake #1: Not Piercing the Inner Seal (Nothing Comes Out)
Many people experience confusion when the how do I use a caulk gun steps fail to work. You pull the trigger with all your might, but absolutely nothing emerges from the nozzle. Always remember to use a long pin to break that hidden inner factory seal.
Mistake #2: Cutting the Nozzle Too Wide (Bead Too Thick)
Cutting too much plastic off the tip is a common error for both beginners and experienced users. An oversized hole dumps giant amounts of material, creating a terrible mess. Start with a micro cut at the tip because you can always make it wider later.
Mistake #3: Moving Too Slowly (Caulk Piles Up)
Squeezing the lever while your arm remains completely still causes the paste to pile up. You must keep your hand traveling at a uniform speed while applying pressure. Think of this task like drawing a continuous line with a thick marker.
Mistake #4: Not Releasing Pressure (Caulk Keeps Dripping)
Standard manual frames hold intense pressure inside the tube even after you let go. The compound will continue to bleed onto your floors if you set the tool down. You should press the release catch immediately after finishing your line to prevent any dripping.
Quick Start Checklist for First-Time Users
Keep this simple six-step summary in mind when you prepare your workstation:
- Cut the plastic nozzle at a sharp 45-degree angle.
- Pierce the hidden inner foil seal with a long metal wire.
- Load the container into your metal gun cradle tightly.
- Squeeze the trigger while moving your hand at a steady pace.
- Smooth the wet bead out with a wet finger or a profiling tool.
- Release the rear rod pressure to stop messy floor leaks.
5. Pro Tips: How to Use a Caulk Gun with Different Materials
Different home improvement chores require entirely different types of chemical products. Changing your material changes how the gun handles and how you must finish the job.
How to Use a Caulk Gun with Silicone
You will discover that learning how to use a caulk gun with silicone requires serious arm strength. Pure silicone is very thick and resists sliding through a narrow nozzle.
Cheap manual tools will cause intense hand fatigue during a large bathroom renovation. A battery-powered tool makes this job effortless by doing the heavy squeezing for you. Always smooth silicone with soapy water because it acts as a lubricant, allowing your finger or smoothing tool to glide without sticking.
How to Apply Grout, Liquid Nails & Construction Adhesive
Heavy building glues require tremendous mechanical force to move through the tip. When learning how to apply grout with a caulking gun, you must cut your tip wide.
Standard low-cost guns will literally bend or crack under this intense stress. People should use a high-torque gun or a cordless caulking gun for thick construction glues.
How to Create a Perfect Bead Every Time
Consistency is the ultimate secret to achieving a professional finish on your trim. Keep your elbow tucked close to your ribcage to steady your arm. Maintain the exact same tool angle from the start of the line to the finish.
How to Work with Awkward Angles and Tight Spaces
Sealing behind a toilet or underneath a kitchen cabinet can test your sanity. You can purchase special angled nozzle extensions that rotate around corners. Another option involves sliding flexible vinyl tubing over the tip to reach tight spots.
Video Tutorial: Watch a Pro in Action
Watching a professional contractor handle the tool provides excellent visual guidance. Search for how to use a caulk gun on YouTube videos to see proper hand mechanics. You can check out the ONE VAN product demo video to watch the process online.
6. Can You Use Caulk Without a Caulk Gun? (Alternatives Explained)
Sometimes you only have a tiny crack to fix and dislike buying extra equipment. You can apply the compound manually, but it takes patience.
Method 1: Manual Squeeze (For Tiny Jobs Only)
You can buy small squeeze tubes designed for minor bathroom touch-ups. Learn how to use a caulk tube without a gun by using your bare thumb power. This alternative works fine for a tiny one-inch crack, but it tires your hands.
Method 2: Using Pliers to Squeeze the Tube
You can use a pair of pliers to squeeze a standard large tube if you do not have a caulk gun. Insert the handle of the pliers into the back of the cylinder against the flat plastic disk. Push the handle forward firmly to force the plunger deep into the container.
Method 3: Putty Knife or Popsicle Stick Application
You can squeeze some sealant out onto a disposable piece of cardboard first. Use a wooden popsicle stick or a putty knife to scoop up small amounts. Press it directly into the open joint by hand to patch small cosmetic blemishes.
Method 4: What Reddit Recommends (Creative Alternatives)
Looking up how to caulk without a caulk gun on Reddit threads reveals some unusual methods. Homeowners suggest using metal spoons, plastic zip-ties, and old credit cards to shape the paste. These items can smooth an edge, but they rarely create a true waterproof seal.
When a Caulk Gun Is Worth the Investment
Trying to avoid buying the proper tool is rarely worth the extra mess. If your repair line is longer than twelve inches, a proper caulk gun will deliver vastly superior results. A basic manual tool costs less than fifteen dollars and saves you hours of clean-up time.
7. Common Caulk Gun Mistakes and How to Fix Them
Even experienced DIY enthusiasts run into issues when they rush through their work. Understanding these common errors helps you fix your technique immediately.
1. Not Piercing the Inner Seal (Nothing Comes Out)
You loaded the frame and pulled the trigger, but nothing happened. The internal foil seal is still blocking the flow. Take the tube out and push a long nail deep into the nozzle to clear the path.
2. Applying Too Much Pressure (Messy Overflow)
If you wonder why caulk keeps coming out of gun nozzles, you are squeezing too hard. Excessive hand force floods the joint with extra material. Lighten your grip and move your arm down the track a bit faster.
3. Using the Wrong Angle (Gaps Not Properly Filled)
Holding the gun flat against the wall prevents the paste from sinking into the crack. Holding it at a straight 90-degree angle scrapes the material away. Keep a steady 45-degree lean to get optimal penetration into the gap.
4. Skipping the Smoothing Step (Ugly, Uneven Finish)
Leaving the raw line exactly as it exits the nozzle looks highly unprofessional. Raw beads will eventually peel away because they do not stick tightly to the edges. Always slide a damp finger over the line to secure the bond.
5. Cutting the Nozzle Incorrectly (Wrong Bead Size)
A giant nozzle cut makes it impossible to fill narrow cracks cleanly. Make your first cut near the very tip of the plastic cone. Test the flow on cardboard, and increase the cut size only if necessary.
6. Not Releasing Pressure (Continuous Dripping)
Is your caulk gun facing the dripping problem? You must press the thumb release catch immediately after every single stroke. Upgrading to a dripless model handles this chore automatically.
7. Do You Push or Pull a Caulk Gun?
People often wonder which direction is correct for home projects. Professional tradespeople prefer pulling the gun because it forces sealant deeper into the joint and leaves a cleaner finish. Pushing can skip over gaps and should generally be avoided.
8. Conclusion
Mastering a caulk gun comes down to maintaining a steady hand and preparing your surfaces well. Taking the time to clean your work area ensures your home stays protected from water leaks for decades to come. Grab a practice piece of cardboard, test your flow rate, and complete your home repairs with absolute confidence.
9. FAQs
How to caulk a bathtub with a caulking gun?
Scrape away all the old, moldy sealant with a razor tool first. Apply painter's tape to the edges, cut your nozzle to match the gap, and apply a premium kitchen and bath silicone. Learn how to use a caulking gun in the bathtub by smoothing the lines with a wet finger.
How to stop drips and overflow on a caulking gun?
Press the small metal release trigger on the back of your tool at the exact moment you finish drawing a line. This action relieves the built-up physical tension inside the cylinder so the material stops moving instantly.
Do you need a caulk gun for sealant?
Yes, you need a gun for any repair job longer than a few inches. Trying to squeeze standard tubes by hand is incredibly difficult and results in a messy, wave-like finish.
When to use a caulking gun?
You should use this tool whenever you need to seal a joint where two different materials meet. Common home examples include the open spaces around bathroom sinks, tubs, window frames, and baseboards.


