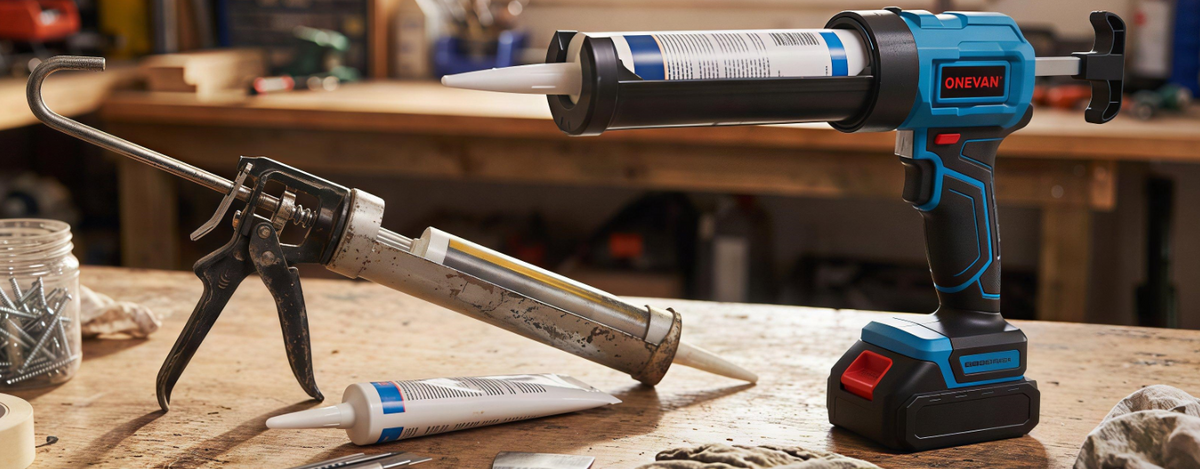
The caulking gun is a versatile tool that can be used in various applications. This is a handheld device that can be used to seal a bathtub, seal around a window, seal cracks on a patio, or seal gaps on the baseboard. The use of this device is very simple.
1. Caulking Gun Fundamentals: Loading, Cutting, and Operating Techniques
You should study the basic setup before a repair. The most common issues are due to improper loading of the tube or too much material being cut from the nozzle.
How to Put a Caulk Tube in the Gun Without Making a Mess
Pull the plunger rod all the way back. Many manual guns require you to press the release tab near the handle first. Insert the caulk tube in the frame, pointing the nozzle forward. Push the rod forward until the plunger is against the base of the tube.
If you are learning how to put together a caulking gun, typically there isn't much to assemble. With most models, the tasks are:
- Loading the cartridge
- Cutting the nozzle
- Opening the inner seal
How to Cut the Nozzle So the Bead Is the Right Size
Trim the nozzle at about a 45-degree angle. Use a small cut first. It's possible to cut more if the bead is thin, but it can't be made smaller again.
Cut the tip and prick the foil in the cartridge. Some caulking guns come with a puncture rod; if yours doesn't, use an appropriate instrument carefully.
How to Get the Caulk Flowing (and Stop It When You Want To)
Having problems beginning work with your caulking gun? Squeeze the trigger slowly until the caulk is released through the nozzle. Do this on some scrap cardboard or a rag rather than directly on the project.
After the caulk starts to flow, maintain a constant pressure on the trigger. Avoid firing the trigger quickly. That can result in "thick and thin" areas.
At the end of the joint, relax.
- For a manual gun, press down on the lever or pull the rod back.
- The pressure will cease as soon as you let go of the trigger in cordless guns.
2. Cordless vs Manual Caulking Gun: Which One Survives a Full Weekend of DIY?
Both styles can cover typical home repair. The better choice will depend on the amount of caulk that is needed and the amount of control.
Manual Ratchet Gun: Cheap, Reliable, But Your Hand Will Hate You by Sunday Afternoon
If you have only one or two small caulking jobs, you'll want a manual caulking gun. It’s easy to store, inexpensive, and simple. The flow is controlled by squeezing the handle.
It has some drawbacks during longer jobs. Your hand may become fatigued when you press the trigger often, particularly when it is thick sealant or sticky. It can also be more difficult to keep the bead width the same as grip strength decreases.
ONEVAN Cordless Caulking Gun: When You Have a Full Weekend Project List
Do you plan to make more than one repair? AnONEVAN cordless caulking gun will be more convenient. The material is pushed by pressure, so you do less work, and the flow is more uniform.
A manual tool works for light repairs that aren't very often.Cordless caulking gun from ONEVAN are more sensible if you're seeking a faster, more uniform application in multiple jobs.
3. Weekend Fix #1: How to Reseal Your Bathtub and Sink with a Caulking Gun
The joint of a bathroom may allow water to enter if the old sealant breaks down. The new sealant can be used to prevent water from entering that joint.
Firstly, Remove the Old Caulk
- Always remove old sealant before applying new caulk, using either a caulk remover or a scraper. (Any remaining sealant will hinder the new seal).
- Be careful during removal from the bathtub and sink joints to avoid damaging the surface.
- After removal, clean the joint with a common bathroom cleaning solution and wait until it dries completely.
Apply Silicone Caulk to the Tub Joint
- When the joint has been cleaned and dried out properly, insert the silicone tube into the caulk gun. The nozzle must be cut on an angle.
- Use caulk to seal from one end of the joint in one continuous pass. Squeeze the trigger slowly as you move the tube along the joint evenly.
- It is unnecessary to apply a lot of sealant to have an effective seal. The bead should fill the joint without bulging past the surrounding surfaces.
- It will have to be smoothed with the help of a certain type of instrument. A wet finger can also be used in case the instructions permit such action.
- The excess amount of the caulk needs to be removed before it becomes too hard.
- This area must not be disturbed for the period indicated on the package.
In case you were looking for how to apply caulk to a bathtub with a caulking gun, then the main actions are cleaning the joint, applying the correct sealant, applying the correct bead, and waiting for sufficient time to cure.
How to Keep the Caulk from Drying Out in the Gun Between Jobs
- If you plan on using the same tube of caulk at some point during the weekend, then it should be cleaned thoroughly, and its tip covered properly.
- A removable cap that fits on the caulk tubes works well. Some people go for a clean screw that can fit into the nozzle opening.
- Be mindful of air exposure - moisture-cure caulks can skin over if left open, while some products need airtight caps for storage. Kindly refer to the instructions of the caulk manufacturer regarding how to store the product if you wish to use it for a longer duration. Some caulks may harden in the nozzle even when capped, so ensure thorough cleaning.
4. Weekend Fix #2: How to Stop Drafts Around Windows and Doors with a Caulking Gun
Cracks around frames can allow outside air to enter and change the room’s temperature. The best use of caulk comes when using it on small, stationary joints.
Look for Gaps: Where Drafts Lie Around the Window
Inspect the window trim, frame, sill, and area surrounding the window. You may see a crack, or some gaps can be felt on a windy day. Caulk is not an appropriate solution for all openings. If there are large gaps, it may require:
- Backer rod
- Foam
- Other repairs before caulking on top
Caulk the Inside with Paintable Latex (So It Blends In)
Paintable acrylic latex caulk is simple to use for many interior trim areas. It becomes smooth without as much effort and can be painted after it cures. Apply a thin bead along the crack using a small nozzle opening. Smooth when the surface has not set. Get rid of any additional material before it dries out.
Sealing the Outdoor Joints (No Sun, Rain, or Snow Will Get In There)
Use a sealant specifically designed for outdoor use, such as silicone or polyurethane, to seal outdoor joints. You have to take into account the materials being used since not all sealants may stick to wood, vinyl, masonry, or metal.
Clean the joint of any loose materials. Install the bead when the surface is dry, and conditions are conducive to the manufacturer's instructions.
5. Weekend Fix #3: How to Fill Patio Cracks and Seal Outdoor Gaps with a Caulking Gun
For outdoor repairs, thicker products are frequently used. Preparation and the proper cartridge are paramount for outdoor work.
Fill Concrete Patio Cracks with Self-Leveling Sealant
A self-leveling concrete sealant can provide a smoother finish with less tooling for horizontal cracks that are deep enough to require filling. Remove dirt and loose concrete first from the crack. Backer rod can be required in deep joints to prevent the sealant from going too far down. See the product label for suggested joint sizes.
Make sure that the nozzle is held quite close to the crack so that the flow of the material can go on continuously. Sealants that self-level can move around once they are applied; hence, one must not apply too much.
Patch a Metal Roof or Gutter Seam with Your Caulking Gun
People often ask if a caulking gun can be used to seal a metal roof. The gun can be used with compatible roofing or gutter sealant; however, the sealant used is more important than the gun.
Use a sealant specifically labeled for the type of metal and outdoor exposure. Remove the old sealant, rust, and dirt before putting on the new bead.
When working on the roof, exercise caution and only walk on it if it is safe to do so, ensuring you have proper safety equipment. Accessible small gutter joints are ideal for DIY work.
What to Do When Your Caulking Gun Breaks Mid-Project
If the trigger is moving without the rod moving, check if the rod is engaged properly.
- Check the release plate and ratchet teeth of a manual gun.
- Inspect the battery and ensure that the cartridge isn't stuck for cordless guns.
Do you want to learn how to fix a caulking gun? Begin with the easy causes. Take off the tube, clean moving parts of dried material, and install it properly.
6. Weekend Fix #4: What is the Procedure for Creating Flawless Baseboards and Trim Using Caulk?
Filling your baseboards and trim with caulk results in a polished look, enhancing the overall appearance of your home.
Caulk Baseboard Gaps with a Tiny, Thin Bead
You can use paintable caulk at the junction of the wall and the top edge of the baseboard. A thin applicator tip is ideal for wood trimming, as it allows for precise application without excess caulk.
Make sure that the pace of application is even and constant throughout the area being treated. Smooth it straight away. A clean bead will make the trim appear more continuous.
Crown Molding and Ceiling Gaps: Work Overhead Without Making a Mess
Excessive material loss from the nozzle causes mess on the overhead. Make a small hole and hold the gun close to it.
Work in small sections so you can smooth the bead before it begins to skin. For compatible water-based caulking, keep a damp rag on hand for cleanup. Don't forget to follow the caulking product directions.
Use Your Caulking Gun for Grout Touch-Ups and Adhesive Jobs
Some cartridge-based glues and repair materials can be used with a caulking gun. Some useful ones are a small trim bonding aid, panel adhesive, and some grout repair products.
Look at the package for guidelines. If you are using a pre-mixed grout, it is not loaded with a caulk cartridge. Some grout repair products may be pre-mixed and packaged in tubes for caulking guns.
7. How to Clean Your Caulking Gun So It’s Ready for Next Weekend
It can take a few minutes of cleaning to ensure that the gun will perform without hassles and to avoid the prospect of having to deal with dried sealant on the next job.
Wipe the Nozzle and Rod Before the Caulk Cures
When shooting is completed, remove wet residue from the gun frame, rod, and cartridge holder. Apply the cleanup method recommended in the product you have applied.
Water-based caulk can be wiped away with water before drying. Alternatively, silicone may require completely different techniques. Do not place a solvent on plastic or painted tool surfaces without the approval of the tool manufacturer.
Store Partial Tubes So They Do Not Cure Shut
Let off the gun pressure before storing. Remove the cartridge if you are not going to use it soon.
Make sure to clean the nozzle and close and store the tube according to the temperature guidelines provided by the manufacturer. Maintain a vertical position of the tube in order to minimize the chances of leaking.
Indications to Change Your Caulking Gun
Here are some signs that your manual caulking gun may need to be replaced:
- Slip-prone rods
- A bent frame
- A dysfunctional release mechanism
On the other hand, the cordless caulking gun becomes obsolete when:
- The drive system gets jammed repeatedly
- The external casing is cracked or damaged
- The device is erratic during inspection
8. Conclusion
When used adeptly, anelectric caulking gun is a handy tool for solving common weekend problems. Use a small nozzle opening, set up the joint, and apply a small amount of pressure. With all this information, seams, gaps, and trim can be easily controlled, especially in bathrooms.
9. FAQs
Can I use the same Caulking Gun for bathroom and patio projects?
Yes. In most cases, the gun will accept multiple cartridge sizes if they fit. Wipe down the tool between jobs and use appropriate surface caulk or sealant.
How long does caulk take to dry before I can use the bathroom again?
This will vary by product. There are caulks that dry in a couple of hours and others that require a day or more to cure. It is essential to adhere to the curing time stated on the product's packaging.
Is it beneficial for a DIY enthusiast to invest in a cordless caulking gun?
Yes, it can be if you have multiple jobs and/or thick sealants. A manual gun is sufficient for one small repair.
What is the most common mistake when using a Caulking Gun?
One of the most common mistakes you can make is cutting the nozzle too wide. Begin at a small size to help control the bead and to keep cleanup to a minimum.
Can you use a Caulking Gun to apply grout?
Use products packaged for use with a caulking gun. Some pre-mixed grout repair tubes may need different grout tools.