
During wall work, precision and alignment are vital. Installing shelves, tiling walls, placing pictures, framing walls, creating electrical and plumbing lines, or planning them - any slight misstep will cause evident mistakes. Spirit levels have limitations compared to modern laser levels. They are repetitive and need to be checked repeatedly, which may cause cumulative errors on large surfaces.
A line laser level projects straight horizontal and vertical lines across the entire surface, unlike traditional levels that may not cover large areas effectively. This results in easier alignment, quicker setup, and professional-looking results. Homeowners find it easier to complete their own DIY work, and professionals save time and avoid time-consuming mistakes.
The superior models, like ONEVAN 16-line 4D display green laser level, provide multiple lines and adjustable tripods, and they are highly visible even in bright indoor spaces. Green lasers are more visible than traditional red lasers, making them ideal for use in brightly lit rooms.
How to use a laser level on a wall? A laser level helps decrease stress, increase efficiency, and ensure accuracy in a wide range of wall projects. Laser levels have been considered fundamental to contemporary construction and interior design since their introduction, from hanging picture frames to framing and tiling walls.
1. What is a Laser Level and Why Use it on Walls?
A laser level generates a concentrated beam of laser light that projects direct lines onto surfaces. These lines serve as reference points to maintain accuracy over long distances. The benefits of the laser level in projects on the wall include:
- Saving time: Draws straight lines immediately without the need to do the same thing again and again.
- Very precise: It eliminates the possibility of human error with the bubble levels.
- Multi-purpose: They can be used for tiling, wall framing, plumbing, hanging pictures, and wallpaper application.
- Professional finish: ensures straight lines for a polished, professional appearance.
For example, when using a spirit level to install tiles, even a slight misalignment can lead to curved tile work over a long distance. A laser level is used to indicate which line to follow throughout the wall so that every tile fits perfectly. When framing walls, laser levels enable precise positioning of studs, top plates, and bottom plates, saving time and reducing errors.
What are Line Laser Levels
Line laser levels project a line, either continuously in horizontal, vertical, or cross lines, to give visual guides on walls. As opposed to point lasers, which will just show a single dot, line lasers exhibit straight lines on the surface, which means they can be fully directed.
Their operation: Internal prism and mirrors direct the laser beam to bend out the horizontal and vertical lines. More sophisticated models, like the ONEVAN Tool 16-line 4D laser level with tripod, project multiple lines simultaneously, ensuring comprehensive coverage. There are also models that have projections of complex layouts using diagonal lines.
Here’s why line laser levels are the best choice for wall applications:
- Large visibility: The lines of green laser are bright and visible.
- Multi-line projections: This is in expansive areas without repositioning.
- Self-leveling: Corresponds to slight irregularities in floors or walls.
- Flexibility: Ideal for tiling, hanging decoration, framing walls, and plumbing.
Line laser levels are used to make work easier, including tiles, electrical layouts, or fitting shelves and cabinets. They eradicate the guesses and deliver professional outcomes, even to the hobbyists.
2. Preparing to Use a Line Laser Level on Your Wall
Tools and Materials Needed
Before commencing, the following are needed:
- Line laser level (e.g., ONEVAN green laser level)
- Tripod or wall mount
- Measuring Tapes, Pencil, chalk, masking tape.
- Protective eyewear
- Spare batteries or a charger
The availability of all materials also leads to a seamless flow of work. It prevents delays, particularly when a deadline must be met, such as the tiling of walls or the fitting of several shelves.
Safety Precautions and Working Environment Setup
- Clean up the floor and wall space in order to avoid tripping.
- Wear eye protective equipment to prevent exposure to the laser.
- Turn off surrounding lighting, or better, have a laser detector.
- To ensure that the laser level is not moving, ensure that it is mounted.
The accuracy, safety, and efficiency of preparation are achieved through proper preparation. Failure to properly set up may result in poorly drawn lines, wastage of materials, and frustration.
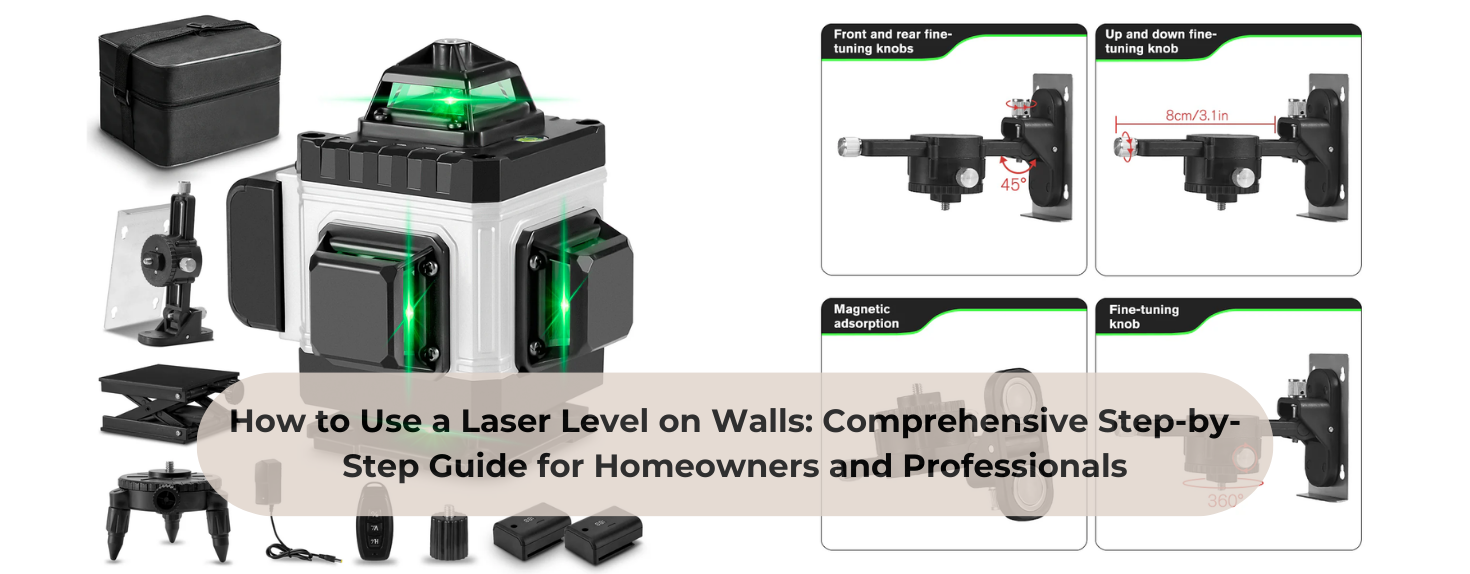
3. How to Attach and Mount a Laser Level on a Wall
Learning how to mount a laser level on the wall? Proper mounting is essential in achieving stability, accuracy, and hands-free functionality. A wall bracket, magnetic mount, tripod, and DIY solution are used depending on the wall project.
Using Wall Mounts and Brackets
Wall brackets are used to offer safe fixing of permanent or semi-permanent structures.
Steps:
- Determine the desired height and direction.
- The position of Mark's screw on the wall.
- Holes to be drilled and a bracket to be attached firmly.
- Install the laser level and align the level to give optimal straight lines horizontally or vertically.
Wall mounts come in handy where high walls, retaining wall structures, and tile work projects are involved, and the wall stability is paramount.
Using Magnetic Mounts and Clamps
Magnetic mounts can be attached to metallic surfaces, which enables them to be repositioned very fast without drilling. Adhesive plates can be used to fix magnetic clamps on non-metal walls.
Tips:
- Make sure to touch the wall flat to avoid distorting lines.
- Gently adjust angles to have a perfect horizontal and vertical centring.
Fits well in temporary or portable installations, e.g., temporary shelving installation or floating wall decoration.
Tripod Setup for Wall Projects
The tripods contain versatility and flexibility in case of uneven floors or higher walls.
Steps:
- Place the tripod legs on a firm surface.
- Slide the laser into the screw mount of the tripod.
- Change height and tilt to the desired line position.
- Turn all knobs to lock as a measure to prevent movement.
- Turn on self-leveling in order to have correct lines.
Tripods are also necessary for framing walls, laying retaining walls, or handling ceiling-high tiles.
Alternative DIY Mounting Methods
The temporary arrangements can be made by using:
- Taping materials to secure light lasers.
- Piled heavy boxes to gain height.
- Clamps on furniture edges.
- Hooks of lightweight gadgets.
While these methods are convenient, always ensure stability to maintain accuracy. Even minor movements during operation can lead to misaligned lines.
4. Step-by-Step Guide on Using a Line Laser Level on Walls
How does a laser level attach to the wall? These steps are important for ensuring accuracy, effectiveness, and professional outcomes in any wall project.
Step 1 - Positioning and Mounting the Laser Level
Position your laser at the price you want and mount it on a tripod, a bracket, or a magnetic clamp. In the case of high walls, good stabilisation and safety measures must be followed. If you are wondering how to use a laser level at a high point on a wall, a secure mounting system, such as a tripod extension or a wall bracket, is essential.
Step 2 - Powering On and Self-Levelling
The majority of the current laser levels are self-leveling. Switch the device on and choose horizontal, vertical, or cross-line mode. Allow time for the lines to stabilise before marking. Very uneven surfaces may need to be levelled manually.
Step 3 - Marking Layout Lines
Draw the projected laser lines with a pencil, chalk, or masking tape. For wall tiling, use masking tape to maintain the lines for several rows. For cabinet installations, identify the points of the mark bracket along the laser line.
Step 4 - Verifying Line Accuracy
Compare the projected line with several reference points. Adjust the tripod, mount, or laser position when necessary. Correct verification eliminates the errors that accumulate, particularly on long walls. Builders also learn how to use a laser level to plumb a wall by projecting a vertical line and checking alignment from floor to ceiling.
Step 5 - Applying Marks for Specific Projects
When learning how to use a laser level for framing walls, mark the studding, the top plate, and the bottom plate. Framing walls: Mark the studs, top plate, and bottom plate.
- Covering walls: Lay tiles with a straight line.
- Cabinets/shelves: Rabbit brackets on laser lines.
- Plumbing/electrical: Centre outlets, switches, pipes, and conduct lines.
- Wallpapering: Have straight sides and correct matching of the patterns.
5. Common Applications of Line Laser Levels on Walls
Hanging Pictures, Frames, and Wall Art
Have long walls that are built with a perfectly straight layout.
Installing Shelves and Cabinets
This ensures evenness and consistent spacing.
Wall Tiling and Backsplash Installation
Understanding how to use a laser level for tiling walls helps prevent uneven grout lines and misaligned tiles. Eliminates curvy tiles and uneven grouting.
Wallpapering and Wall Coverings
Follows the right way along edges.
Electrical and Plumbing Projects (Concealed Installations)
Plan properly hidden installations, e.g., outlet boxes, pipes, and conduits. Laser levels make work easier, minimise mistakes by humans, and save time on the monotonous tasks. They are the things needed not only by DIYers but also by professional contractors. Contractors often research how to use a laser level for retaining wall construction to maintain even block alignment and correct elevation.
6. Troubleshooting and Tips for Using Your Line Laser Level on Walls
Dealing with Uneven or Textured Walls
Enable self-leveling mode, adjust the tripod's angles, and mount it correctly. Ensure that the device is set on a fixed surface and the marking is done. On rough walls, the laser should be slightly offset from the surface to create a clearer line, and never forget to recheck the placement before drilling.
Improving Laser Visibility in Bright Rooms
A green laser is more visible in bright places, hence it is better to use it since red is not clearly visible. Laser glasses or detectors would also provide higher accuracy. It would be better to reduce the intensity of the interior lighting or eliminate direct sunlight to make the beam more noticeable.
Handling Battery or Power Issues
Potentially keep backup batteries in case a device dies or is fully charged. Poor battery life may cause image dimness and loss of precision. Check the battery position during longer activities to prevent break-ins.
Avoiding Movement or Vibrations During Use
Place the tripod on a hard, flat surface and lock all parts. When marking the device, do not touch or move it. Please finish off your markings prior to the allowance of heavy movement around.
Cleanup and Maintenance Post-Use
After wiping the lens with a soft cloth, the lens is dusted. Remove the mounting tape and place the device in the case. This can be guaranteed by proper maintenance, thus longer life and reliable performance.
This has numerous reference points and is applied to ensure accuracy in long walls. Proper troubleshooting and maintenance will extend a device's lifespan and ensure even performance.
7. Conclusion
A line laser level is a high-quality, powerful tool for precise, professional wall projects. Correct installation, hanging, and use are necessary in order to achieve the best results. Laser levels are time-saving, minimise errors, and are used in framework, tiling, shelf installation, and when hanging pictures. Items such as ONEVAN laser levels are reliable, adaptable, and suitable for homeowners and professionals.
A line laser level can be used to make sure your projects are straight, accurate, and pleasing to the eye. It is an investment in productivity, precision, and good workmanship.
8. FAQs
Can a line laser level be used on all types of wall surfaces?
Yes. It is applied to textured, plaster, drywall, brick, and concrete walls. Bright or reflective surfaces may require a laser detector to enhance visibility.
Can a single person effectively use a line laser level without assistance?
Yes, but most particularly using self-leveling models and a tripod or magnetic mount. In some cases, an additional person can be employed to assist with safety and efficiency when there are high walls or the project is lengthy.
How to adjust the laser level on uneven walls?
Adjust the tripod or wall mount angles with self-leveling, and verify the lines using a measuring tape at multiple points.


