
A rivet gun is a handheld device designed to install rivets, which are permanent mechanical fasteners used to hold two materials together. When used properly, a rivet gun creates clean, professional outcomes and avoids substandard joints. Poor technique leads to poor connections and spoiled material.
Rivet guns have diverse applications, including automotive body repair, HVAC ductwork, and aircraft maintenance. They are also commonly used for metal roofing, gutter installation, and many residential DIY projects. They are applied to fix sheet metal, fit brackets, mend lawn equipment, and repair metal furniture.
1. What Is a Rivet Gun?
A rivet gun is a tool used to create permanent mechanical joints between materials by pulling and compressing rivets. The device clamps the rivet mandrel, which is the central pin, exerts pressure on the rivet body against the workpieces, and cuts off the mandrel at a predetermined location. The fastener so produced is tight, secure, and will not back out.
The basic principle is the same in all models, but the source of power and the mode of application of force vary. Manual guns rely on the operator's strength to function effectively.
Pneumatic models make use of pressurised air. Both corded and cordless electric versions use the power of a motor to provide pulling force. Both categories apply to certain project sizes and work conditions.
2. Understanding Different Types of Rivet Guns
There are four different types of rivet guns with different features. You will read each in detail below.
Manual Rivets
Manual rivet guns are the easiest and most affordable choice. You operate them simply by squeezing the handles together. This action pulls the mandrel through the rivet body to set it.
They work perfectly for light-duty projects, especially when using aluminium rivets up to about 1/8 inch in diameter. If you go beyond that size, however, your hands will get tired quickly. You'll likely be limited to setting only 20 to 30 rivets before your grip strength gives out.
Pneumatic Rivet Guns
Pneumatic rivet guns offer serious pulling force without causing operator fatigue. They connect directly to an air compressor. You simply pull a trigger, and compressed air drives an internal piston, setting rivets in seconds. These tools are built to handle heavy-duty applications all day long. They easily manage steel rivets up to 1/4 inch in diameter, processing hundreds of rivets per hour. The drawback is that you absolutely need a compressor and an air hose, which means you are physically tied to your air supply.
Corded Rivet Guns
Corded rivet guns plug into standard wall outlets. They provide consistent electrical power without needing an air compressor. These power tools bridge the gap between manual and pneumatic options. They offer good pulling force, typically between 1,500 and 2,500 pounds, suitable for steel and stainless steel rivets. You get reliable performance for medium to heavy duty work. Although the power cord restricts mobility, it helps you avoid the noise and maintenance that a compressor requires.
Cordless Rivet Guns
Cordless rivet guns give you the freedom of battery power, along with the necessary force from electric motors. Modern lithium-ion batteries can typically drive between 200 and 500 miles per charge, depending on size and material. The ONEVAN 2.4–5.0mm Cordless Rivet Gun Tool is a good example of this type. It's compact, powerful enough for 3/16 inch steel rivets, and perfectly portable to use anywhere on the job site.
3. Types of Rivets Commonly Used
There are three common rivets used in different projects. Let’s read about each in detail.
Blind rivets
Blind rivets, often called pop rivets, are the most widely used type for DIY and light commercial projects. Their key advantage is that they install from one side only. This feature is critical when working on projects where you cannot reach the back of your workpiece, such as metal panels.
During installation, the mandrel pulls through the rivet body. This action expands the body on the blind side, so the mandrel snaps off flush.
Rivets are available in several materials, including aluminium, steel, and copper. These include aluminium, steel, stainless steel, and copper. Their diameters generally range from 1/16 inch to 1/4 inch. The grip range specifies the total thickness of materials that can be securely joined with that rivet. This range spans from 1/8 inch to 1 inch.
Solid Rivets
Solid rivets are significantly stronger than blind rivets. They appear in serious structural work. Examples include aircraft construction, structural steel, and heavy machinery. However, they need access to both sides of the material. Installation is complex and requires a bucking bar to compress and form the tail of the rivet after it’s been placed.
You won't use these with standard rivet guns because they demand specialised equipment. This includes pneumatic rivet hammers and hydraulic riveters.
Drive Rivets
Drive rivets are single-piece fasteners. They resemble nails that have wide heads. These rivets don't require any rivet guns at all. Instead, you will strike them into your pre-drilled holes. For instance, the shaft will expand as it is driven in, so it locks the rivet nicely in place. They are generally used to attach nameplates and license plates.
4. Tools and Materials You'll Need Before You Operate a Rivet Gun
First, gather all necessary tools and materials before starting the project. Nothing kills momentum like stopping mid-project to hunt for tools.
Rivet gun
Choose based on your project volume and rivet sizes. A manual rivet gun is suitable for occasional repairs involving small aluminium rivets.
You are installing gutters, repairing a metal shed, and doing light automotive work? A cordless model like the ONEVAN 20000N Brushless Cordless Rivet Gun makes sense because you move freely around vehicles and buildings without dragging cords.
Rivets
Select the appropriate size, length, and material of rivets according to the needs of your project. The sum of the material thicknesses is measured, and 1.5 times the rivet diameter is added to get the minimum grip length. As an example, when joining two pieces of 1/16 inch aluminium sheet metal, the overall thickness is 1/8 inch. Grip length is determined using a 1/8 inch rivet, which is multiplied by 1.5 to give 3/16 inch. This, combined with the 1/8 inch thickness of the material, provides a total rivet length of about 5/16 inch.
Aluminium rivets can be used to fasten aluminium, plastic, wood, and light steel. Steel rivets are used to connect steel to steel and other hard materials, whereas stainless steel rivets are employed to resist corrosion in sea and outdoor conditions. Where feasible, it is preferable to use a rivet material that is compatible with the workpiece material to prevent galvanic corrosion.
Drill and Drill Bits
In drilling, use a variable-speed drill and bits matching the rivet shaft diameters. A 1/8-inch rivet needs a 1/8-inch opening and sometimes a 9/64-inch opening. Holes that are too small will not allow the rivets to be inserted, and holes that are too large will lead to poor grip. Clean, sharp edges cut straight, sharp edges cut straight, dull edges cut crooked, burrs, and crooked rivets. It is recommended to have a collection of drill bits ranging from 1/16 inch to 1/4 inch, in 1/32 inch increments, for versatility in rivet sizes.
Measuring tools
Use a tape measure, combination square, and ruler for marking hole locations accurately. Centre punch to dimple your mark before drilling to prevent the bit from wandering. Digital calipers help verify rivet diameters and hole sizes when precision matters.
Safety gear
Non-negotiable items include safety glasses to protect against metal chips and mandrel fragments that shoot out when rivets are set. Work gloves prevent cuts from sharp metal edges and protect against hot surfaces if you are doing automotive work. Ear protection matters with pneumatic guns because they are loud. You are working indoors? Add a respirator if drilling galvanised metal because painted surfaces release harmful dust.
Materials to join
Remove paint, rust, oil, and coating from the joint area. Burrs and rough edges prevent tight fits. Clamp pieces together before marking and drilling to maintain alignment through the entire process.
5. Step-by-Step Guide: How to Use a Rivet Gun
Step 1: Selecting the Right Rivet Gun and Rivets
First, evaluate your project requirements. Count how many rivets you will install. If you need to install 10 rivets on a metal shelf bracket, a manual rivet gun will suffice. If you need to install 200 rivets on a truck bed repair, powered assistance is advisable. You need powered assistance, either cordless pneumatic power.
Then, check rivet sizes and materials. Small aluminium rivets measuring 1/8 inch or less can be used with any rivet gun. Steel rivets 5/32 inch and larger demand higher pulling forces, typically 1500 pounds and above. Read your gun's specifications. Most manufacturers provide lists of maximum rivet sizes based on material type. The ONEVAN 125mm Angel Grinder & Cordless Rivet Gun Combo Kit handles up to 3/16 inch steel rivets, covering 90 per cent of DIY and light professional applications.
Consider your work environment. You are moving around a vehicle and working outside, away from power? Cordless wins. If you are in a shop with compressed air plumbed in, pneumatic rivet guns deliver endless power. Are you tight on budget and doing one small project? Manual costs less than dinner.
Match rivets to materials. aluminium to aluminium? aluminium rivets. Steel body panels? Steel rivets prevent galvanic corrosion and match parent metal strength. Outdoor applications near water? Stainless steel resists rust. Furthermore, check the grip range to ensure your rivet is long enough to pass through your materials, with enough shaft extending to form a proper tail.
Step 2: Preparing Your Workpieces
Clean your materials first. Use a wire brush, sandpaper, and solvent to remove rust, paint, oil, and contaminants from the joint area. Clean metal surfaces ensure tight contact between the materials, allowing for a secure rivet formation. Dirty joints can leave gaps, reduce joint strength, and increase the risk of premature failure in the overall assembly.
Next, align your workpieces exactly as they will be joined. Use clamps, magnets, and temporary fasteners to hold alignment. Use a square and a straightedge to check for alignment. Pieces that shift during drilling create misaligned holes, weakening joints, and preventing rivet installation.
Mark hole locations with a permanent marker, scribe, and centre punch. Measure twice, mark once. Typical rivet spacing runs 3 to 4 times the rivet diameter, with a minimum edge distance of 2 times the diameter. You are using 1/8 inch rivets? Space them 3/8 to 1/2 inch apart, at least 1/4 inch from edges.
Using a centre punch on each mark creates a dimple that guides the drill bit and prevents it from wandering. Hit the punch firmly with a hammer because a shallow dimple will not contain the bit.
Step 3: Drilling Holes for Rivets
Select a drill bit matching your rivet's shaft diameter. Check the rivet package because it specifies the hole size. Most blind rivets need holes equal to the shaft diameter and sometimes 1/64 inch larger. A 1/8 inch rivet typically needs a 1/8 inch hole; a 5/32 inch rivet needs a 5/32 inch hole.
Start your drill slowly to establish the hole, then increase speed for efficient cutting. High speed in soft metals like aluminium works fine; slower speeds suit harder materials like steel and stainless. Apply steady pressure, but do not force it. Let the bit cut at its own pace.
Drill perpendicular to the surface. Angled holes make rivets sit crooked and reduce joint strength. For drilling through thick materials and multiple layers, drill from both sides whenever possible to ensure accuracy. This reduces burr formation and ensures clean holes through all layers.
After drilling each hole, remove the bit and check alignment through both pieces. You should see clean, round holes with minimal burrs. If holes do not align perfectly between layers, use a round file or a slightly larger bit to expand the holes for better alignment.
Deburr all holes before moving forward. Use a deburring tool, a larger drill bit spun by hand, and a countersink. Sharp edges on holes damage rivet mandrels, tear tool nosepieces, and create stress points that cause materials to crack.
Common drilling mistakes to avoid: Using dull bits because they create rough, oversized holes and tear material. Drilling without clamping causes pieces to shift and holes to misalign. Drilling too fast in hard materials can generate excessive heat, potentially damaging both the bits and the workpieces.
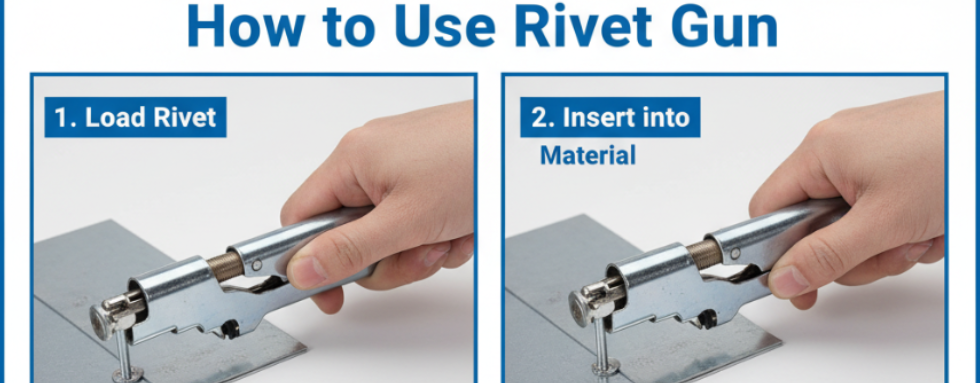
Step 4: Inserting the Rivet
Take a rivet from your supply. Inspect it for damage, including bent mandrels, crushed bodies, and contamination. Damaged rivets, such as those with bent mandrels or crushed bodies, will not set properly.
Hold the rivet between your thumb and forefinger, mandrel pointing away from you. Insert the rivet into the hole from the side where you want the manufactured head to sit. The manufactured head is the preformed head that comes on the rive, and it is larger and cleaner than the tail that forms during installation.
Push the rivet through until the manufactured head sits flush against your material. The mandrel should extend out the back side. If the rivet will not go through, the hole is too small and misaligned, so do not force it. Remove the rivet, check the hole, and enlarge if necessary.
For blind rivets specifically, remember you only access one side. Insert the rivet from the visible side. The tail will form on the blind side, where you cannot see or reach. This is why they are called blind rivets; you are unable to see the installation process from the backside.
Check that materials are tight together with no gaps. Gaps between pieces create weak joints. If you notice gaps, be sure to re-clamp the materials tightly before installing a rivet with a longer grip length to achieve a secure joint.
Step 5: Operating the Rivet Gun
Now comes the actual riveting. First, load the rivet into your rivet gun, ensuring the mandrel is correctly seated in the nosepiece. Different tools have different loading methods, but the concept stays consistent.
For manual and most powered rivet guns: Insert the rivet's mandrel into the gun's nosepiece. Push it in until the nosepiece seats against the rivet's manufactured head. The mandrel extends into the tool's pulling mechanism.
Check that the nosepiece size matches your rivet. Most guns include multiple nosepieces for different rivet diameters. The nosepiece should fit snugly around the mandrel with minimal play. Wrong nosepiece size causes mandrel slippage, incomplete rivet setting, and tool damage.
Position the rivet gun perpendicular to your workpiece. Pull the tool body so the nosepiece presses firmly against the rivet head. You need this contact pressure because it provides the reaction force that compresses the rivet body while the mandrel pulls through.
Hold the gun steady with both hands if it is a manual tool. For powered guns, maintain firm pressure against the workpiece with one hand while operating the trigger with the other.
Squeeze the handles for the manual gun and pull the trigger for the powered gun. You will feel resistance as the mandrel pulls through the rivet body. Keep squeezing smoothly and steadily. Avoid pumping the trigger; instead, maintain continuous pressure until you hear and feel a sharp pop as the mandrel breaks off.
The pop indicates the mandrel has pulled completely through, expanded the rivet tail on the blind side, and broken at its designed break point. The rivet is now set. Release the trigger and handles. The gun will automatically eject the spent mandrel from the nosepiece.
Pull the tool away from the workpiece. Inspect the installed rivet; the manufactured head should sit flat against the surface without any tilt.
Check if the blind side is accessible because you should feel a bulge in the tail. If the rivet head stands proud and the tail does not form, you have problems. See the troubleshooting section for solutions.
6. Common Problems in Using a Rivet Gun and How to Fix Them
You can face different problems in operating a rivet gun. Below, you will read common problems, causes, and solutions.
1. Weak or Incomplete Rivets
Problem
The rivet appears set but pulls out easily, and the manufactured head stands proud of the surface.
Cause
Several factors create weak rivets. Your rivet might be too short for the material thickness because the mandrel pulls out before forming an adequate tail. The rivet gun might lack sufficient pulling force for the rivet material and size. Worn and incorrect nosepieces allow mandrel slippage before proper setting. Dirty and corroded rivets prevent adequate compression.
Solution
First, verify rivet length against material thickness. Calculate the total thickness by multiplying the rivet diameter by 1.5, adding it to the thickness, and then comparing it to the rivet grip range. You need overlap because rivets that are slightly too long work better than those that are too short. Switch to longer rivets if required.
Then, check your rivet gun’s specifications to ensure compatibility with the required rivet type and size. A manual gun will not reliably set 5/32 inch steel rivets, no matter how hard you squeeze. Upgrade to powered assistance when needed.
Inspect the nosepieces for wear; they should fit snugly around the mandrels with minimal play to ensure proper functioning. Replace worn nosepieces because they are cheap and critical to proper operation.
Clean rivets before installation. Wipe with solvent if they are oily, and brush off corrosion. Store rivets in dry containers to prevent degradation.
2. Rivet Gun Jamming
Problem
The gun will not release the mandrel after breaking, and the mandrel pieces get stuck in the pulling mechanism.
Cause
Mandrel fragments lodge in the nosepiece and jaw mechanism. Worn jaws do not release smoothly. An incorrect nosepiece size allows mandrels to sit crooked. Forcing oversized rivets damages internal components. Lack of lubrication in manual guns increases friction.
Solution
Stop immediately when jamming occurs. Do not force it because you will damage the tool; instead, disconnect the power and air supply. Remove the nosepiece and inspect the jaw area. You will likely find broken mandrel pieces wedged in the mechanism.
Use needle-nose pliers, small picks, and compressed air to remove debris. Work carefully because jaws are hardened steel but can chip. After clearing debris, test the jaw action by hand. They should open and close smoothly without binding.
Lubricate manual rivet guns periodically. A drop of machine oil on the pivot points and jaw mechanism reduces friction and jamming. Do not over-lubricate because excess attracts dirt.
Use correctly sized rivets for your gun. Forcing large rivets through undersized guns causes jams and damage.
3. Poor Rivet Appearance
Problem
Rivet heads sit crooked, and the manufactured head gets deformed during the setting process.
Cause
You drilled holes at an angle instead of perpendicular. The nosepiece does not sit flush against the rivet head during pulling. Excessive force and the wrong nosepiece size crush the manufactured head. Burrs around holes prevent flush seating. Materials are not clamped tightly, allowing movement during setting.
Solution
Start with the drilling technique. Use a drill press and drill guide to ensure perpendicular holes. In the field, sight along the drill from two angles before starting. Practice on scrap until you can consistently drill straight holes.
As you rivet, hold the gun perpendicular to the workpiece. Rock it slightly to find the angle where the nosepiece sits completely flat against the rivet head before pulling. You are not trying to compress the manufactured head; just hold it steady while the mandrel pulls through.
Check nosepiece size before each rivet. It should match exactly. An oversized nosepiece allows the rivet head to crush inward; an undersized one will not fit over the head properly.
Deburr every hole thoroughly. Even small burrs can hinder flush seating and lead to gaps between materials. Clamp materials firmly before riveting. Use C-clamps, locking pliers, and temporary fasteners to eliminate movement. The pulling force can shift poorly clamped pieces, tilting rivets as they set.
4. Excessive Noise or Vibration
Problem
The rivet gun makes unusually loud noises and vibrates excessively during operation.
Cause
Pneumatic guns with incorrect air pressure produce excessive noise and vibration. Low battery charge in cordless models causes motors to strain—loose components in any gun type rattle during operation. Worn bearings and bushings in powered guns create vibration. Damaged jaw mechanisms in manual guns produce grinding sounds.
Solution
For pneumatic guns, check the air pressure at the compressor and gun inlet. Most rivet guns operate at 90 to 120 PSI (pounds per square inch). Higher pressure increases noise without improving performance; lower pressure causes strain and incomplete riveting. Adjust to the manufacturer's specifications.
With cordless guns, monitor battery charge. A battery below 20 per cent struggles with larger rivets, causing the motor to strain and vibrate excessively. Charge and swap batteries before performance degrades noticeably.
Inspect all external fasteners, covers, and handles for tightness and visible wear. Tighten loose screws and bolts. Missing fasteners allow components to rattle. Replace any stripped or damaged fasteners to ensure the tool's efficiency.
Persistent noise after basic troubleshooting may indicate that internal components are worn and require professional service or replacement. Continuing to use damaged tools not only reduces efficiency but also increases the risk of injury, making regular maintenance essential.
5. Inconsistent Riveting Depth
Problem
Some rivets are set flush, while others stick up and sit recessed.
Cause
Variations in hole size create inconsistent rivet seating. Mixed rivet batches with slightly different dimensions produce variable results. Inconsistent pulling force from low batteries and fluctuating air pressure affect the setting depth. Operator technique varies between rivets because applying more or less pressure against the workpiece changes the results. Worn nosepieces allow mandrels to slip inconsistently.
Solution
Start by standardising your drilling process. Ensure you use the same sharp bit for all holes in a project to maintain consistency. Replace bits when they dull because even slight size changes from wear affect consistency. Check several holes with callipers and a plug gauge to confirm their size. Variations beyond 0.001 inches create noticeable differences in rivet seating.
Use rivets from the same batch and manufacturer for visible work. Manufacturing tolerances, while small, accumulate into visible variations. Store open rivet containers sealed to prevent moisture absorption, which can affect the diameter.
With cordless guns, maintain battery charge above 30 per cent for consistent performance. Motor power drops as voltage decreases, resulting in a variable pulling force. Swap to fresh batteries when you notice the first sign of power reduction.
Pneumatic gun users should install pressure regulators on the tool if the compressor pressure fluctuates. This maintains consistent PSI regardless of compressor tank pressure cycling.
7. Conclusion
You now know how to use a rivet gun from start to finish. The process is not complicated: select appropriate tools and rivets, prepare materials carefully, drill precise holes, insert rivets correctly, and operate your gun with steady technique. Get those fundamentals right, and you will create strong, professional-looking joints every time.
Begin with practice rivets on scrap material before attempting visible work, to ensure proficiency in handling the rivet gun. You will develop a feel for proper technique, learn how much force your specific gun needs, and discover how different materials and rivet types behave. Those 20 to 30 practice rivets save you from ruined projects.
Choose your rivet gun based on project scale and frequency. Manual guns handle occasional light work. Cordless models balance power, portability, and versatility for serious DIY and professional use. Pneumatic guns dominate high-volume production environments.
8. FAQs
What are the advantages of using a cordless rivet gun compared to manual or pneumatic models?
The cordless rivet guns eliminate the wear and tear caused by manual operation, as well as the use of air compressors and electrical connections. They enable the operator to move freely around job sites, vehicles, and narrow spaces without having to handle cords and hoses. Lithium-ion batteries today can supply enough power to charge 200 to 500 rivets, including steel rivets up to 3/16 inch, which is sufficient for most automotive, HVAC, and metal fabrication applications.
How long does the battery of a typical cordless rivet gun last on a full charge?
With aluminium rivets within the 1/8 -inch range, it is possible to expect 400 to 500 rivets per charge. In the case of steel rivets of 5/32- to 3/16-inch size, the number of rivets reduces to 200 to 300 rivets, due to the greater pulling force needed. Most cordless guns use 18-V and 20-V lithium-ion batteries with capacities of between 2.0 Ah and 5.0 Ah. Greater amp-hour ratings increase the run time, respectively. The batteries must be charged at the beginning of every working day; for long-term projects, extra batteries should be kept charged.
Can cordless rivet guns handle large diameter rivets or heavy-duty applications?
Cordless rivet guns handle rivets up to 3/16 and 1/4 inch, depending on the model and material. For aluminium and soft materials, most quality cordless guns can handle 1/4 inch rivets effectively. Steel and stainless steel typically limit you to 3/16 inch because, beyond that, the pulling force requirements exceed what battery-powered motors can deliver efficiently.
Are cordless rivet guns easy to control and accurate for precision riveting jobs?
Cordless guns weigh 3 to 5 pounds, which is light enough for one-handed operation with good control. The trigger provides progressive control over pulling speed in better models, allowing you to start slowly for alignment and then increase speed for efficient setting. You maintain better nosepiece-to-workpiece contact than with manual guns since you are not fighting handle-squeeze resistance.
Can cordless rivet guns be used on different materials such as aluminium, steel, and plastic?
Aluminium is easiest because it is soft and requires the least pulling force. Steel demands more power but remains within most cordless guns' capabilities up to 3/16 inch sizes. Stainless steel is the hardest and limits you to smaller sizes. Plastic, fibreglass, and composites work fine but require backing washers to prevent crushing soft materials during setting.


