
If you own a flock, you know wool grows fast every single year. You must shear this thick wool before summer arrives. You need excellent tools to do this job well. Many people ask how to sharpen sheep shears because dull blades make the whole job very hard. We will show you the right way to care for your tools today and make the job easier.
Importance of Sharpening Sheep Shears
Sharp sheep shears blades cut thick wool like hot butter. You push the machine, and it glides forward easily, saving you a lot of time. You save all your energy for other farm chores. The sheep stays calm during the shearing process. A calm sheep makes your job much safer.
Dull blades stop in the wool and pull the thick fibers. Pulling causes sharp pain in the animal's skin. The sheep will kick its legs and jump around. This risk of injury can disrupt your entire workday. You must keep those blades sharp, as it protects everyone in the barn.
Types of Sheep Shears Commonly Used
Farmers use many kinds of tools for this big job. Some people use old manual scissors. Other farmers use big electric machines with long power cords. These long cords cause big problems as they get tangled in the farm dirt. The sheep might step on the cord. You might trip over the power cord.
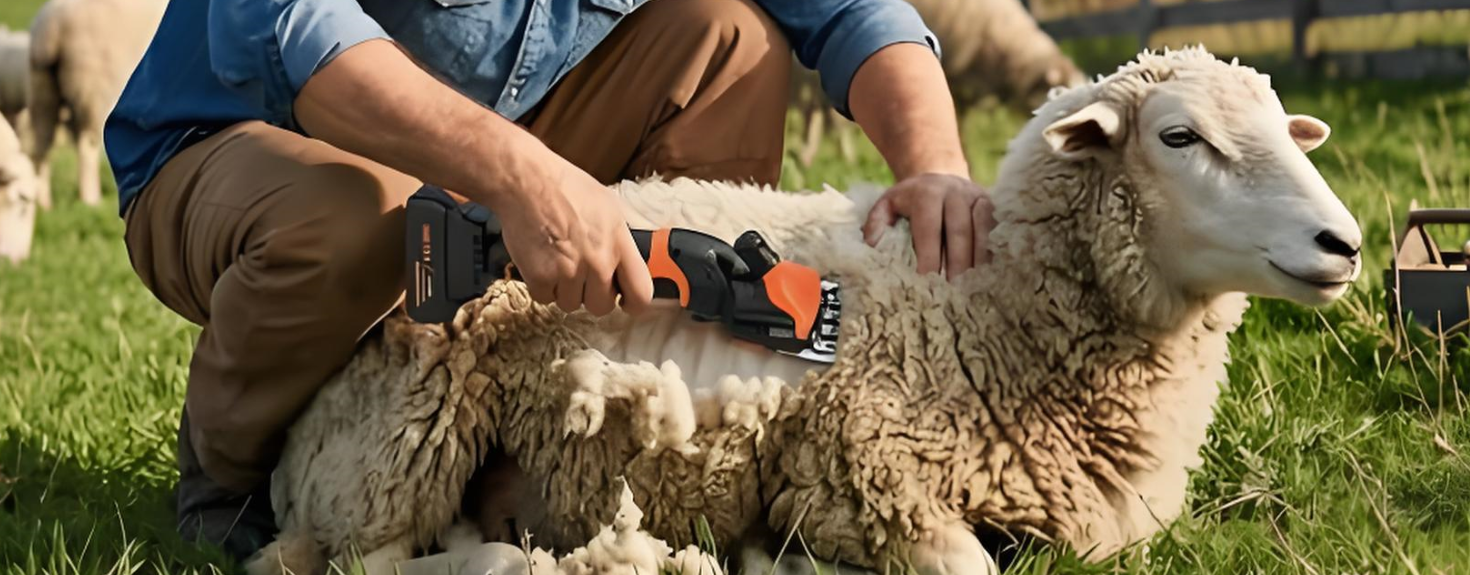
Today, many smart farmers choose cordless sheep shears. These modern cordless tools have no wires at all. You can walk around the animal easily. Battery-powered sheep shears give you ultimate freedom on the farm. You can trim wool right in the middle of a big green field. You do not need a wall plug anymore.
We highly recommend ONEVAN tools for your farm. ONEVAN makes the absolute best sheep shears for this tough job. Their cordless sheep shears make trimming small spots around the face and legs super fast and easy.
1. Understanding Sheep Shear Blades
Before you sharpen anything, you must learn about your machines. Look at the shiny metal parts on the front that do all the hard work. They bite right through thick, dirty wool. If you know your tools well, you can fix them perfectly.
Anatomy of a Sheep Shear Blade
Let us learn about the two main parts. First, you have the comb, which has long metal teeth. It slides right over the sheep's soft skin. It guides the fuzzy wool straight into the machine.
Next, you have the cutter. The cutter moves back and forth very fast across the comb. It slices the wool instantly. Some farmers ask how to sharpen sheep shearing blades correctly.
It is important to understand the exact shape of both the comb and the cutter first. The factory shapes the metal with special angles. Factory workers make these parts from very hard steel, as it lasts much longer than soft metal.
How Sharpness Affects Shearing Performance
Sharp tools slide right through the heavy fleece. You push the machine gently, and the motor does all the heavy work. Dull tools stop suddenly in the dirty wool. They snag the strong fibers and pull the delicate skin upward.
The poor sheep feels this awful pinch right away and will fight you to escape the pain. You have to push the machine much harder, and perhaps your hands will ache badly by noon.
2. Tools and Materials Needed to Sharpen Sheep Shears
You cannot do a good job with bad tools. You need a great kit to start. Set up a special place to work in your barn or garage. Find a very sturdy table and gather all your items before you start working.
Essential Sharpening Tools
You need a few basic things on your table. Get a good, flat metal file and a sharpening stone. Some people call this stone a whetstone. You also need a smooth hone that polishes the rough metal to a fine finish.
Some farmers use a small rotary tool instead. This tool spins a tiny rock very fast. You can also buy a special kit just for this job. Store owners sell these handy kits in one box.
Optional Equipment for Professional Sharpening
Real pros use big, powerful machines and a fast belt grinder. A belt grinder has a spinning loop of rough sandpaper. It removes thick metal very fast. Pros also use special honing oil on the stone as it catches the tiny metal dust.
The oil helps maintain the honing process by preventing metal dust buildup on the stone. Some experts even use a small magnifying lens. They look very closely at the shiny metal edge.
Safety Gear and Workspace Setup
You must stay safe in your shop! Always wear thick leather gloves, as sharp metal edges can cut your fingers fast. Wear clear safety glasses over your eyes because tiny metal pieces will fly into the air. They can hit your eyes and cause blindness.
3. Step-by-Step Guide: How to Sharpen Sheep Shears Manually
Now we will do the real work together. Follow these simple steps carefully. Take your time with every step. Learning how to sharpen hand shears for sheep takes real patience.
Step 1: Disassemble Shears if Needed
First, take the tool apart and grab a strong screwdriver. Take out the small screws and pull the metal parts off the machine. Take a permanent marker and draw a small dot on the upper blade. This dot helps you put the tool back together the right way later.
Step 2: Cleaning the Blades
Next, wash the metal parts thoroughly as they carry barn dirt. They had salty sheep sweat and oily wool bits. You cannot sharpen dirty metal successfully, as dirt can cause uneven sharpening and damage the blade. Knowing how to sharpen sheep-hand shears means knowing how to clean them first. Wash them in a bowl of warm, soapy water. Scrub them hard with an old toothbrush.
Step 3: Inspecting the Blades for Damage
Now, look at the edges very closely. Hold them right under a bright light. Do you see any deep dents? Do you see broken chips? Sometimes you hit a hard rock hidden in the wool. The rock breaks the thin metal edge. Give extra attention to these bad spots during the next step.
Step 4: Filing and Grinding the Blade Edge
Grab your metal file and hold it flat on the table. Push the file straight across the edge. Push it away from your body. Lift the file up in the air and bring it back to the start. Push it away again, but do not drag the file backward over the metal. Dragging ruins the tool quickly.
You must maintain a consistent angle, typically around 45 degrees, every time you sharpen. Many beginners wonder how to sharpen sheep shearing combs and cutters well. The secret is the steady angle.
Step 5: Honing the Blades for a Smooth Edge
The heavy file leaves rough scratches, so you must smooth the metal perfectly. Take your flat sharpening stone. Put a few drops of water or oil right on the stone and rub the blade on the stone in small, tight circles.
Step 6: Reassembling and Lubricating Shears
Look for the little marker dot you made earlier. Line up the parts exactly right. Reinsert the screws into their designated holes and tighten them securely with your screwdriver. Put a few drops of oil on the moving parts for lubrication.
4. How to Use Power Tools to Sharpen Sheep Shears
Hand filing takes a very long time. Power tools do the hard work incredibly fast. You must learn some new tricks to use power tools safely.
Rotary Tools with Grinding Attachments
You can use a small spinning tool for quick touch-ups. Put a tiny grinding rock on the end of the tool and hold the blade tightly in one hand. Touch the spinning rock lightly to the blade edge. Move it along the edge very carefully. Let the fast machine do the work.
Belt Grinder Sharpening Method
A big belt grinder holds massive power. Turn the loud grinder on and hold the blade carefully against the spinning rough belt. You must hold it at the perfect angle. The belt takes off metal in just seconds.
Professional Sharpening Services Overview
Sometimes you just cannot do the job because maybe the blades hit a giant rock. Maybe you have absolutely no extra time today. You should send your tools to a real expert. Experts own big, expensive machines that effectively sharpen the tools to a like-new condition.
5. Tips for Maintaining Sharpness and Extending Sheep Shears Blade Life
We will give you special secrets on how to sharpen sheep shears' blade edges less often. Care for your tools every single day, as a little care saves a lot of hard work later.
Regular Cleaning and Oiling Practices
Clean your tools after you finish every single sheep. Yes, every single sheep! Take a small brush to clean the sticky wool off the shearing machine. Put a few drops of oil on the moving cutter component for lubrication.
Proper Storage to Avoid Damage
Never throw your expensive tools in a dirty bucket. Never leave them in damp barn soil. Water in the night air makes horrible rust, and rust eats the sharp edge very fast. Put your tools in a dry, clean box.
Avoiding Overheating During Frequent Sharpening
Extreme heat kills hard steel forever. When you sharpen with a fast machine, the metal gets very hot. If the metal turns blue, it indicates overheating, which can compromise the steel's integrity.
Periodic Inspection and Touch-Ups to Prevent Big Wear
Check your tools every single week. Look closely for tiny dull spots and fix these tiny spots right away. A quick touch-up takes only one minute.
6. Troubleshooting Common Problems When Sharpening Sheep Shears
Things go wrong sometimes. You try your absolute best, but the tool does not work right. Stay calm and address the issue methodically. We will look at common mistakes people make.
Uneven Blade Edges After Sharpening
You look at the edge after you finish, and it looks wavy. One side sits higher than the other side. These mistakes happen when you push harder on one side. You did not keep your hands perfectly steady. Go back to your flat, sharpening stone. Rub the blade flat on the wet stone and press evenly with all your fingers.
Blades Still Pulling or Snagging Wool
You turn the strong machine on, and it still pulls the wool! Why? The metal might have a tiny burr on it. A burr is a tiny hook of metal on the very edge. You cannot see it with your eyes.
Run your fingernail gently over the edge. If it catches your nail, you have a burr. Take your fine stone. Give the blade one gentle swipe on the back side. The bad burr will fall off.
Excessive Metal Removal Leading to Blade Replacement
You ground the metal too much today, so the comb teeth look very thin, like needles. The cutter looks incredibly tiny. The tool will not cut wool anymore. You cannot fix significant damage to the shears, so it's advisable to discard the compromised components. Buy brand new parts from the store, and next time use a much lighter touch!
Managing Shear Alignment Issues Post-Sharpening
You put the tool together, but it rattles loudly. This means you have put the parts on wrong. The cutter does not sit flat on the comb. Stop the machine immediately! Take it apart again and look at the factory marks. Seat the cutter exactly on the comb teeth. Tighten the top tension knob perfectly.
7.Conclusion
You learned everything about tool care today. You learned how to clean the metal perfectly and how to file the edges flat and smooth. Keep practicing these good skills every season. Your hands will learn the right angles perfectly. The shearing days will become fun and fast. You will love using your ONEVAN cordless sheep shears more than ever.
8. FAQs
How often should sheep shears be sharpened?
You should check them after completing each shearing session. If you cut very dirty wool, you must file the edges every single hour. Clean wool lets you work much longer.
Can I sharpen cordless sheep shears blades myself?
Yes, you can do it easily! The blades on ONEVAN cordless sheep shear work just like all other blades. Take them off the machine. Use your wet stone and put it back on. It is very simple.
What angle is best for sharpening sheep shear blades?
Look closely at the original factory edge. Follow that exact line perfectly. Usually, the angle sits around 45 degrees. Never invent a new angle yourself.
What are the signs my cordless sheep shear blades need sharpening?
The cordless sheep shear will slow down noticeably. You have to push the tool very hard, and the animal complains loudly. The wool looks incredibly messy and chopped.
How to know when it’s time to replace sheep shear blades instead of sharpening?
Look at the metal thickness carefully. If the teeth feel sharp like sewing needles, they are too thin. If they break off during work, throw the set away immediately. Buy a fresh set for animal safety.


