Shortening a chainsaw chain is essential for maintaining optimal performance. Over time, chains can stretch or become too long, affecting cutting efficiency. A properly sized chain helps reduce wear and ensures smooth operation. Common reasons for shortening include chain wear, incorrect fit, or damage. In this step-by-step guide, you will learn how to shorten your chainsaw chain effortlessly. Subsequently, your chainsaw will be cutting wood like butter. Here’s a quick maintenance tip that'll make a real difference.
1. Understanding Chainsaw Chains
Chainsaw chains incorporate various sizes and specifications. The right knowledge to select the right one can make a big difference in performance. Below, you will read every key element that defines chainsaw chains.
Chainsaw Chain Sizes
Chainsaw chains are classified based on several factors. These are:
- Pitch
- Gauge
- And drive link count.
These classifications are crucial for ensuring compatibility with your chainsaw, affecting both safety and cutting performance. Your saw's specific requirements determine the size. These factors include the bar length and the engine power. Chain sizes can vary, so checking your chainsaw's manual for the exact specifications is crucial. Common classifications include small, medium, and large chains. However, it is the pitch, gauge, and drive links that will truly determine the fit.
Chain Pitch
Chain pitch is one of the most important specifications of a chainsaw chain. It is the distance between the centers of two adjacent drive links. These are measured in inches. This measurement directly impacts how well the chain fits into the saw’s bar groove. Essentially, pitch affects both the cutting performance and efficiency of your chainsaw.
When the chain pitch is smaller, such as 1/4", the chain tends to cut more smoothly and accurately, making it ideal for fine, precise work. A larger pitch is designed for heavier-duty cutting and more powerful saws, providing more stability and faster cuts.
Here are some common chain pitch sizes:
- 1/4" Pitch: This is a small pitch, typically used on lightweight chainsaws. It’s ideal for fine, precise cutting, often in softer woods. It's commonly found on saws with smaller engines and bars.
- .325" Pitch: This is a versatile, mid-range pitch. Generally, it is used on medium-sized chainsaws. It provides a good balance between cutting speed and smoothness.
- 3/8" Pitch: This pitch is generally used by heavier-duty saws. It's great for cutting through thick wood or hardwoods. The larger pitch provides more stability and power, allowing for faster cutting.
- .404" Pitch: This is the largest pitch, typically found in professional-grade chainsaws. It’s built for tough tasks like felling large trees or cutting through dense hardwoods. It provides maximum cutting power but requires a more powerful chainsaw engine to maintain speed.
Chain Gauge
This section will discuss chainsaw chain gauges and why they matter so much.
Chain gauges are basically metal tabs that fit into the bar groove on your chainsaw. If they don't fit perfectly, you'll have problems.
Too thick? The chain will be super tight, creating crazy friction that'll wear down your equipment faster than you can say "lumberjack."
Too thin? You'll end up with a loose, wobbly chain that could skip, slip, or - worst case - completely fall off the bar while you're cutting. It’s not something you want happening when you're handling power tools.
Common chain gauge sizes include:
- .050" Gauge: This is the most common gauge size. You will find it on chains used by homeowners and professionals alike. It fits a variety of saw models and is widely used in mid-range chainsaws.
- .058" Gauge: This is slightly thicker than the .050" gauge. It’s often found on professional saws designed for tougher tasks. The thicker gauge provides extra durability but requires a saw with more power.
- .063" Gauge: This is the thickest gauge, typically used in heavy-duty chainsaws. It is built for maximum strength and stability. This is good for large saws to handle big jobs like cutting through thick, dense logs.
Drive Link Count
The drive link count refers to the number of drive links on the chain. It is critical for determining the overall length of the chain. The number of drive links primarily impacts how the chain fits and engages with the bar.
To calculate the drive link count:
- Measure the total length of the bar.
- Divide this length by the pitch to estimate the number of links needed.
- Double-check the chain specifications provided by the manufacturer.

2. Why You Might Need to Shorten a Chainsaw Chain
1. Chain Wear and Damage
Chainsaw chains naturally wear out over time. They are exposed to dirt, debris, and tough materials. The chain’s teeth become dull and less effective. As the chain wears, it can also stretch. A worn or damaged chain will not cut as well. Shortening the chain can help restore its performance by removing any damaged sections, resulting in smoother cuts.
2. Too Loose Chainsaw Chain
A loose chain can be dangerous. If the chain is too loose, it can slip off the bar or cause vibrations. This makes the chainsaw harder to control. A loose chain can also cause uneven cuts. By shortening the chain, you can adjust its tension. This ensures the chain stays tight and secure. A tight chain is safer and performs better.
3. Chain Stretching
Chains naturally stretch after heavy use. When the chain stretches, it becomes longer. A stretched chain does not fit the bar correctly. This can cause the chain to rub against the saw or work inefficiently. Shortening the chain brings it back to the right length. This restores its fit and helps the chainsaw run smoothly again.
4. Chain Damage Prevention
A damaged chain can affect cutting performance. It might get stuck or cause excessive vibration. This can lead to other damage to your chainsaw. If you notice cracks or broken links, shortening the chain helps. It removes any damaged parts and prevents further problems. A properly maintained chain lasts longer and works better.
5. Adjusting to Different Bar Lengths
If you change to a shorter bar, the chain may be too long. A chain that is too long for the bar can be dangerous. It won’t fit properly and may not cut efficiently. In this case, you need to shorten the chain. A shorter chain will match the shorter bar. This improves performance and makes your chainsaw safer to use.
6. Changing Cutting Applications
You might use your chainsaw for different tasks. For example, felling large trees requires a longer chain. But trimming branches may need a shorter chain. When your cutting needs change, you may need to adjust the chain length. Shortening the chain makes it more suited to lighter tasks. It helps improve cutting speed and accuracy.
7. Replacing Broken Links
Sometimes, a link in the chain breaks. This can affect the chain’s ability to cut smoothly. A broken link also puts strain on the saw. If a link is broken, you’ll need to remove it. Shortening the chain helps eliminate the broken link. This keeps the chain in good working condition and ensures safety.
3. Signs that Your Chainsaw Chain Needs Shortening
1. Dull Cutting Performance
If your chainsaw chain is dull, it won’t cut through wood easily. You might notice it takes longer to make cuts. The chain may also struggle to cut through the thick wood. This is a sign that the chain is not sharp enough or is too long. Shortening it can help improve its cutting power.
2. Excessive Chain Slack
Excessive slack means the chain is too loose. A loose chain can cause safety issues. It can also reduce cutting efficiency. If the chain hangs too low or moves too easily, shortening it can fix this. It will tighten up and fit properly, improving performance.
3. Chain Derailment
Chain derailment happens when the chain slips off the bar. This can be dangerous and stop your chainsaw from working. It’s often caused by a chain that is too long or loose. If your chain keeps coming off the bar, it might need shortening. This will help it stay in place and run safely.
4. Visible Wear and Tear
If you notice visible wear or damage on the chain, it’s time to check the length. Wear and tear can cause the chain to stretch or lose its original shape. A worn-out chain can affect performance and safety. Shortening the chain removes worn parts and restores its function.
5. Chain Binding
Chain binding occurs when the chain gets stuck in the wood. This can happen if the chain is too tight, too long, or not aligned properly. If you feel resistance while cutting, the chain may need adjustment. Shortening the chain can fix this issue and help it move smoothly again.
6. Inconsistent or Uneven Cuts
If your cuts are uneven or inconsistent, your chain might be too long. A long chain can cause the saw to wobble or cut crookedly. Shortening the chain can make the cuts more precise and steady. It will help you achieve cleaner, smoother cuts.
7. Chain Jumps Teeth
If the chain jumps teeth while cutting, it’s a sign that something is wrong. This can happen if the chain is too loose or too long. A jumping chain can be dangerous and cause damage. Shortening the chain can prevent the teeth from jumping and keep the chain stable.
4. Preparation for Shortening a Chainsaw Chain
Safety Gear: Protect Yourself First
Before you start, ensure you are properly equipped with safety gear.
- Grab some tough gloves to shield your hands
- Put on safety goggles to protect your eyes from wood chips.
- Wear sturdy boots that'll keep your feet safe.
Tools You'll Need
Round up these essentials:
- A chain tool (your best friend for this job)
- Lubricating oil to keep things smooth
- Measuring tape or ruler
- A file or chain sharpener
- Pliers for any tricky link removals
Pick Your Workspace
Find a spot that's:
- Clean and bright, so you can see what you're doing
- Spacious enough to move around
- Clutter-free to avoid accidents
Pro tip: Use a sturdy table or workbench. This will help keep your chainsaw steady and make the entire process easier and safer.
Quick checklist:
- Safety gear
- Power off
- Tools ready
- Workspace prepped
You're good to go!

5. Step-by-Step Guide to Shortening a Chainsaw Chain
Follow these steps to shorten your chainsaw chain safely. Each step is easy to follow, so you can confidently do it.
Step 1: Determining the New Length
First, inspect the chain carefully. Look for worn, damaged, or stretched parts. Use a measuring tape to check how long the chain is. Compare it to the size that fits your chainsaw’s bar. Mark where you want to shorten the chain. Make sure to keep the chain straight to ensure an even cut. If the chain is too long, measure the length you need to remove. This will help you keep it at the right size for your chainsaw.
Step 2: Take the Chain Off the Chainsaw
For electric chainsaws, ensure that the battery is removed before proceeding. Loosen the bolts holding the bar. Turn off your chainsaw before starting. Slide the bar off carefully. Then, remove the chain from the sprocket. Be careful when handling the chain, as the teeth are sharp. Place the chain on a flat surface for easy access while shortening it.
Step 3: Shortening the Chain
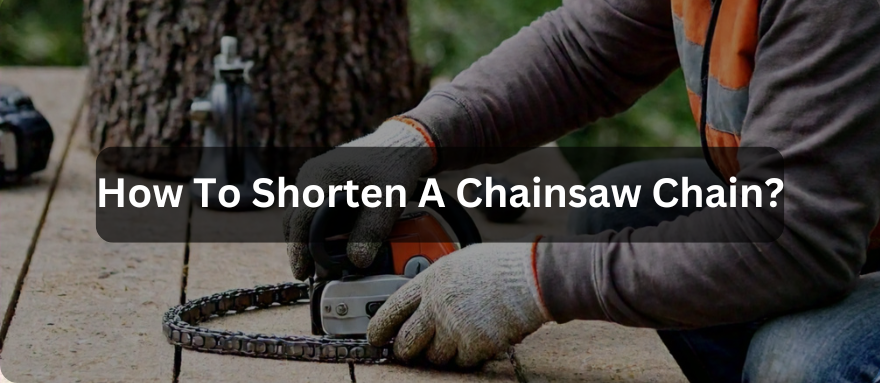
Now, it’s time to shorten the chain. Use a chain-cutting tool or chain breaker to remove the unnecessary links. This tool helps loosen the rivets that hold the links together. You may need pliers to remove damaged or broken links. Work slowly and carefully to avoid damaging the chain. Keep the chain straight as you cut to make sure it stays aligned. After shortening, check the chain’s length again to ensure it fits properly. It should match the size you measured earlier. If you need to remove more links, do so carefully.
Step 4: Put the Chain Back on the Chainsaw
Once the chain is shortened, place it back on the chainsaw. Start by sliding the chain onto the bar. Make sure it fits properly in the sprocket. Reattach the bar to the chainsaw body. Tighten the bolts securely but avoid over-tightening. Check the chain’s movement along the bar. It should move freely but not be too loose. Adjust the tension if needed. A properly tensioned chain helps prevent slippage and ensures smooth cuts.
Step 5: Testing the Chainsaw
After putting the chain back on, testing the chainsaw is important. Please turn it on and check the chain’s movement. It should run smoothly without jumping or slipping. Adjust the tension again if the chain is too tight or loose. Test the chainsaw by cutting a small piece of wood. The chain should cut through easily without resistance. If it works well, you’re done!
6. Common Mistakes to Avoid When Shortening a Chainsaw Chain
1. Not Wearing Protective Gear
Protecting yourself from sharp edges, flying debris, and accidents is paramount before you work on a chainsaw. Put on gloves, goggles, and sturdy boots before starting.
2. Inaccurate Measuring the Length of the Chain
Using a measuring tape is crucial to ensuring that the chain fits properly. Don't guess the length. Measure twice to ensure accuracy.
3. Removing Too Many Links
It’s easy to remove too many links if you rush. Be careful to only remove what’s necessary. If you remove too many links, the chain may become too short for your chainsaw. Always double-check the length before cutting the chain.
4. Neglecting to Check Compatibility
In addition, make sure you are shortening a chain that will fit your chainsaw's bar. Chainsaws come in various sizes. If the chain does not fit the bar, it will not operate properly.
5. Forgetting to Maintain Proper Tension
After shortening the chain, remember to check the tension. A chain that’s too tight can cause damage to the saw. A chain that’s too loose can slip or jump off. Make sure the chain has the right amount of tension to avoid both problems.
6. Ignoring Chain Orientation
Chains have a specific direction they should be installed. If the chain is installed backward, it won’t cut properly. Always check the chain’s orientation before reattaching it to the chainsaw; the teeth should face forward, towards the cutting direction, for optimal performance. The teeth should face forward, toward the direction of cutting.
7. Overlooking Chain Lubrication
It would be best if you lubricate your chain before use to prevent overheating or wear down. This reduces friction and extends chain life.
8. Not Inspecting for Other Types of Damage
While shortening the chain, make sure to inspect it for other damage. Look for broken links, bent teeth, or worn spots. If you find any issues, it’s better to fix them before using the chain. Damaged chains can cause accidents or affect cutting performance.
9. Rushing the Process
Take your time when shortening the chain. Rushing can lead to mistakes, like cutting the chain too short or missing important details. Work slowly and carefully. This will ensure that the job is done right and the chain is properly adjusted.
10. Failing to Consult the Manual
Always consult the chainsaw’s manual before making any adjustments. The manual provides important information about chain size, tension, and other specifics. Following the manufacturer’s recommendations will help you avoid mistakes and keep your chainsaw in good condition.
7. Conclusion
In conclusion, shortening a chainsaw chain is simple if done carefully. Measure accurately, maintain proper tension, and check compatibility. Always wear protective gear and consult the manual. Avoid rushing, and inspect the chain for damage. Following these steps ensures your chainsaw works safely and efficiently for longer.
By the ways, if you're looking for a brushless cordless chainsaw,you can also consider the following ONEVAN cordless chainsaw below:
- ONEVAN 6" Cordless Telescoping Pole Chainsaw
- ONEVAN 6" Mini Portable Cordless Chainsaw
- ONEVAN 8" Cordless Brushless Outdoor Pruning Saw
- ONEVAN 8" Telescoping Pole Brushless Cordless Chainsaw
- ONEVAN 16" Brushless Cordless Electric Chainsaw
- ONEVAN 12" Brushless Cordless Chainsaw
- ONEVAN 125mm Brushless Cordless Circular Saw
- ONEVAN 180mm Brushless Cordless Circular Saw
- ONEVAN 32mm Variable Speed Cordless Reciprocating Saw
- ONEVAN 15mm Brushless Cordless Reciprocating Saw
Similarly, we also have matching chainsaw chains for sale, please see below for details:
- ONEVAN 16 inches Chainsaw Chains and Guide Plate
- ONEVAN 4/6 Inch Chainsaw Chains and Guide
- ONEVAN Set of Steel Chains and Guides for 6/8 Inches
8. FAQs
Can I shorten a chainsaw chain myself?
Yes, you can do it with the right tools. Get a chain tool and follow careful steps. Take your time and be patient.
How often should I check my chainsaw chain length?
Check before big cutting jobs or once a season. Watch for signs of wear or loose chains. Regular checks prevent bigger problems.
Is it safe to use a chainsaw with a shortened chain?
Yes, if done correctly and precisely. Measure carefully and ensure proper fit. When in doubt, ask a professional.

