
Got snow blocking your path? Want to clear it fast and easily? This guide will show you simple ways to shovel snow the right way! Many people get hurt or tired because of their incorrect snow shoveling technique. When it is cold, your heart works more for blood circulation. Lifting heavy snow the wrong way puts a huge strain on your back and heart. People get injured or even die every year just from bad shoveling habits.
Shoveling the wrong way will waste your time and energy. This is because the correct technique allows efficient and thorough snow removal. You will be feeling better and can go back inside without unnecessary pain. That's why following these tips is very important!
The first step is to choose the right snow shovel. The correct shovel makes the job much easier and requires less hard work. Choosing the right tool is half the battle!
1. Understanding Different Types of Snow Shovels
Before commencing work, you must familiarize yourself with your equipment, as snow shovels are available in various formats. Each variant is suited for a distinct type of snowfall and location, so you must select the right implement for the task at hand.
Manual Snow Shovels
Firstly, consider the standard manual shovel. This simple implement relies solely on your muscle power and typically features a long grip and a broad blade made of polymer or metal.
Manual shovels come primarily in two styles: pushers with wide, curved blades, and scoopers with smaller, deeper blades. For lifting jobs, choose a lightweight yet robust shovel, ideally around 3 pounds.
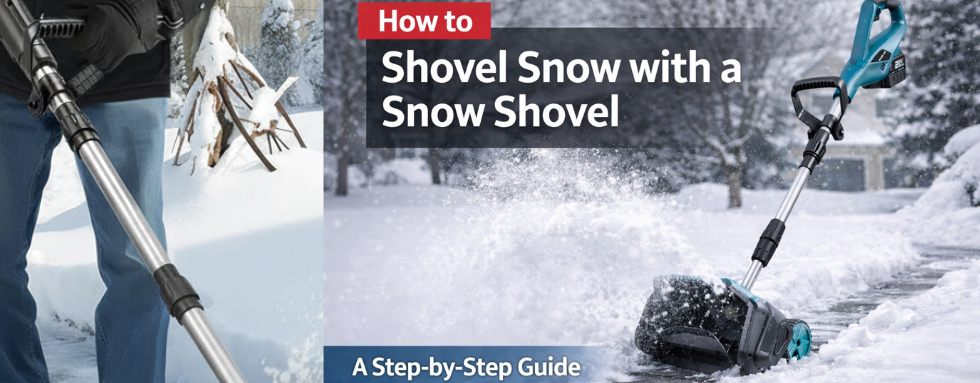
Cordless Snow Shovels
Cordless snow shovels are a new way to clean snow from the paths and other areas. They incorporate a lithium-ion battery to help you move around without any hassle. These cordless snow shovels do a lot of hard work for you, because they require significantly less physical effort than using a conventional shovel. However, you have to guide it and push it where the snow should go.
One notable example is the ONEVAN 12-inch brushless cordless snow shovel. It is incredibly light and simple to transport. It gives strong performance and operates quietly on battery power. It also features a dedicated motor that improves performance and extends service life.
Corded Snow Shovels
When using a corded electric snow shovel, consider the following:
An extension cord is the major reason that people generally avoid corded snow shovels. It can make moving around tricky, especially if you have cars or other things in the way. Corded shovels are usually lightweight and powerful enough for snow up to 8 inches deep. However, if you have a small place, then you can get a corded snow shovel. They give you reliable power that never runs out, so you don't have to worry about a battery dying!
Gas Powered Snow Shovels
Gas-powered snow shovels operate similarly to small snow blowers. These implements use an internal combustion engine, providing superior strength for heavy or deep snow loads. They require neither cables nor power packs. These devices can clear a wider track and handle far deeper, heavier snow than electrical variants. Yet they are typically bulkier, noisier, and require fuel, oil, and routine maintenance. Operate gas-powered snow shovels only outdoors to prevent carbon monoxide poisoning and the need to handle moving components carefully.
2. Step-by-Step Guide to Shoveling Snow with a Snow Shovel Effectively
Now, let's proceed to the practical application. Follow these stages diligently to ensure your effort is productive and secure. Recall: preparation prevents poor execution.
Step 1: Assess the Snow and Prepare Your Tools
First, assess the characteristics of the snowfall. Is it powdery and light, or damp and dense? What is the depth? This assessment will help you choose the most suitable tool.
Manual Snow Shovels:
This is about picking the right shovel for the right snow:
If you have soft, low-density snow, choose a shovel with a polymer blade. This blade has low friction, meaning the snow slides off easily and quickly.
If the snow is dense, you must switch to a metal blade. The metal is stronger and is the most effective way to cut and break frozen layers.
There is a simple trick to save energy! Spray the front of your shovel with a non-stick coating. This reduces how much snow sticks to it, making the shovel lighter and the job much easier.
Cordless Snow Shovels:
Before starting, check the device's battery power. For example, the ONEVAN Cordless Snow Shovel requires a full charge to complete a task without interruption. After that, fix the handle. Set the collapsible and telescopic grip on the ONEVAN model to your preferred height to reduce stress.
Electric Snow Shovels:
Make sure your extension cable is suitable for outdoor use and undamaged. Then plan so the cable is not in your working area, or, if it is, ensure you do not risk tripping over it. Attach the cord tightly to the handle if you want to have better control while working.
Gas-Powered Snow Shovels:
Begin by checking the lubricant and fuel levels. Then, ensure the machine is operating correctly. Clear the discharge chute of any debris from the last use to guarantee proper snow expulsion.
Step 2: Dress Appropriately and Warm Up
There is a protocol for everything. Therefore, your dress should be proper to avoid injuries and health-related issues. In snow shoveling, the biggest problem is that your skin can get damaged from too much cold. So what experts do is they wear many thin clothes, one on top of another. If they get hot doing the work, they just take off one layer, simple. And listen carefully - wear good, strong boots that don't slip, otherwise you'll fall on the ice like a fool. Cover your hands, your feet, and your face properly - these parts get hurt very quickly in the cold. Better wear mittens, not gloves, because mittens keep you warmer.
Now, before starting the work, do some stretching - move your arms, your legs, your shoulders, your back. This is very important, your muscles will be in pain later. And one more thing to share - Stay hydrated before and during snow removal to avoid dehydration in cold weather. People think that we only need water in summer, but no, in winter the body also needs water.
Step 3: Starting the Snow Removal
Timing is essential for starting the work. You should move the snow while it's fresh because newly fallen snow is lighter and easier to manage than packed or partially melted snow.
Manual Shovels:
Begin by clearing a perimeter pathway to define the work area. Attempt to toss the snow completely outside the desired clear area. Another useful tactic is to leverage the wind: shovel in the direction the breeze is blowing so it doesn't return in your face or onto your cleared path.
Cordless and Plug-In Electric Shovels:
Begin at the highest point of your drive or walkway and move downward. Engage the safety switch and squeeze the trigger to start the motor. Push the tool ahead smoothly, allowing the machine's rotating blade to eject the snow. Adjust the expulsion deflector, a key feature on models such as the ONEVAN, to precisely direct expelled material.
Gas-Powered Shovels:
Operate gas-powered shovels exclusively outdoors and away from home openings. Allow the engine to arm slightly, and keep children and pets at a distance while the machine is running.
Step 4: Technique for Clearing Snow
The method used is the most critical element for both productivity and safety. You need to proceed systematically to conserve energy and avoid clearing the same snow twice.
Manual Shovels:
We talked about when to shovel. Let's discuss how to use a manual snow shovel correctly. The biggest risks here are injury and rapid fatigue. You must use the correct technique.
You can start by pushing the snow ahead of you rather than lifting it. Pushing uses far less energy and strains your body much less than repeatedly lifting heavy weights. This significantly reduces fatigue over a long period. If you absolutely must lift the snow, for example, onto a pile, you must use the correct posture.
Do not bend your waist. Bending your waist puts a lot of pressure on your lower back, leading to quick pain and potential injury.
Avoid fully loading the shovel to prevent strain. It is always less tiring and safer to move small portions multiple times than to attempt one massive lift. Also, an important tip here. Alternate your hand positions regularly to balance muscle use. You should start from the right hand leading to the left hand, and vice versa.
Cordless/Plug-In Electric Shovels:Gas-Powered Shovels:
Clear a path about half the shovel’s width per pass to ensure efficiency and prevent clogging. To prevent auger jamming and ensure optimal machine performance. Then, apply consistent pressure and guide the shovel to direct snow accurately, despite the machine’s mechanical ejection. Observe where the snow is being thrown, and utilize the adjustable ejection angle to direct the material away from previously cleared sections and from your person.
Gas-Powered Shovels:
Keep a slow and steady speed all the time so that the machine can properly take in and throw out the snow. After that, gently overlap your passes to ensure the entire width of the path is cleared. Be very careful around the area in front of the auger so as not to throw stones or other pieces of trash .
Step 5: Handling Heavy or Packed Snow
Occasionally, the snow is extremely dense or has been compacted by traffic, which requires a distinct, more careful strategy. Never attempt to lift or move excessive amounts of heavy snow simultaneously.
Manual Shovels:
First, remove the top layer and set it aside. Then, return for a second, thinner layer from the middle. Continue this process, working down to the ground one thin layer at a time. Use a scraper with a heavy metal blade for chipping through any ice buildup beneath the packed snow.
Cordless Electric Shovels:
Make several passes, clearing a very narrow width each time, rather than trying to clear the full shovel width. While these devices can handle $6$ or $8$ inches of material, they perform best with lighter powder. If the snow is wet and heavy, clear only $3$ to $4$ inches at a time. Push patiently and steadily through tough patches.
Plug-In Electric Shovels:
The technique for corded shovels mirrors the cordless approach. Clear a narrower path, half the machine's clearance width. Then maintain a consistent, slow pace, as you have continuous power, so you can take your time and prevent the machine from clogging.
Gas-Powered Shovels:
The core process is simple: Activate the auger and apply minimal forward thrust, allowing the available engine power to achieve maximum material throughput. Crucially, maintain lip contact with the substrate to ensure all residual packed material is captured. If the engine speed drops noticeably, stop moving forward briefly to let the auger clear the snow before continuing. This brief halt allows the auger to clear the accumulated load, thereby preventing operational failure and maintaining peak energy efficiency for the next phase of deployment.
Step 6: Final Cleanup and Maintenance for Snow Shovel
The job isn't complete until your equipment is clean and stored, as this final stage helps ensure your shovel will endure many winters.
Manual Snow Shovels:
First, remove any residual ice or snow from the blade and handle. Then, wipe the metal or polymer components completely dry. Store the shovel in a dry location to prevent corrosion on metal parts or degradation of the plastic.
Electric (Cordless and Plug-In) Snow Shovels:
Confirm the device is entirely switched off and disconnected from the power pack or electrical lead. Then, wipe the exterior to remove any dampness or snow. Store your cordless shovel, such as the ONEVAN model, in its folded state to maximize space efficiency.
Gas-Powered Snow Shovel:
Inspect the auger and chute to ensure no ice or snow is jammed within. Then, clean the machine's exterior. Store the device appropriately, which might include adding a fuel stabilizer if it won't be used for an extended period.
How to Clear Snow Around Objects and Vehicles
Here, we shall decode something simple, yet crucial. For example, how to safely and efficiently remove snow from around your house. Is it simple? Small mistakes here can lead to major property damage or even a risk to your health.
When clearing snow, you must always consider safety measures. It is not just about cleaning the pathway; it’s about preventing carbon monoxide poisoning and property damage.
Many people just clear the windows. But here is the important point: never allow snow to pile up near your car’s exhaust pipe. When you start your engine, run the defrost to melt the ice. A blocked exhaust pipe can allow toxic carbon monoxide to enter the cabin. Friends, this is extremely dangerous and can be fatal. So start your car, activate the defroster, and immediately clear the exhaust area.
When you are throwing snow, be careful. If you have delicate shrubs and plants, throwing heavy snow directly onto them can permanently destroy them. Always direct the snow away from these sensitive areas. If you are using a powered snowblower, slow down near curbs, mailboxes, and fences. Why? Because the machine can easily pick up stones and fling them out at high velocity, causing damage.
Remember, a community effort is important. Clearing snow from the fire hydrants and storm drains near your boundary is not just for you. It ensures emergency services can access hydrants and prevents local flooding as the snow melts. This benefits everyone.
3. Best Practice for Snow Removal Frequency
The data shows that fresh, light powder is significantly easier to move than heavy, compacted, and wet snow. When you wait, the snow compacts under its own weight and absorbs moisture. You will notice that it will become very heavy and dense. This is why you feel so exhausted later.
If a storm is long, do an initial pass while it is still snowing. Taking this preliminary pass removes the light layer and makes the final removal substantially easier. Breaking the work into stages reduces fatigue significantly.
Check your local ordinance. Many jurisdictions legally require you to clear sidewalks and footpaths within a given timeframe. It can be as little as 24 hours after the snow stops. Ignoring this can lead to fines.
The main goal is efficiency and safety. Shoveling snow is a tough physical activity, so you should work in short, focused segments. Step inside every 15 to 20 minutes, warm up, rest briefly, and hydrate. Overexertion and dehydration in cold weather give you serious health risks.
4. Conclusion
We've reviewed all the key elements in this comprehensive guide, and you've recognized that snow removal requires careful preparation and precise execution.
Begin by selecting the correct equipment. Opt for an ergonomic manual scoop for minor tasks, or a potent, effective battery-powered snow shovel like the ONEVAN for rapid clearance of moderate areas. Next, always prepare your body by wearing insulating layers and performing warm-ups before grasping the shovel.
Then, focus on your technique. Push the snow whenever possible. When lifting is necessary, always bend at your knees and use your leg muscles to hoist the load, protecting your back. Also, work intelligently by taking smaller steps and clearing snow from your path.
Finally, place safety first. Take regular rest breaks, maintain hydration, and heed your body's signals. If you have a history of cardiac issues, consult your physician before attempting to shovel. By following these measures, you will ensure your winter chores are both productive and secure.
5. FAQs
1. What Material Is Best for Shoveling Dense Snow?
You should pick a metal blade for when the snow is very, very heavy or it is frozen like hard ice. Metal blades offer superior strength and durability for cutting through packed or icy snow. But, for snow that is new and light, like fine powder, a strong plastic blade is better. Polymer is lighter, and it is less taxing for your body.
2. How Often Should I Clear Snow After a Storm?
Begin shoveling early and repeat frequently to prevent heavy accumulation. This is because the snow that just fell is much lighter, and you can manage it easily. If you wait for many hours, the snow becomes heavy! If the snow is still falling, you must do a first sweep to take away some of the snow that has built up. This makes the final job much simpler. Also, remember always to check your local law because some places tell you that you must clear the sidewalk within 24 hours after the snow stops.
3. Can Snow Removal Pose Health Risks? How Are They Prevented?
It can be dangerous. Taking away snow can cause serious medical problems. Why? Because when you do this hard work when it is very cold, it can put a big strain on your heart. Also, you can get muscle injuries, especially in your lower back.
To stop these, you must do these steps:
- Talk to the Doctor
- Warm Up
- Go Slow
- Lift Correctly
- Wear Appropriate Layered Clothing
4. Is It Better to Remove Snow Immediately or Wait for the Storm to End?
It is much better to clean the snow early, even if the falling snow has not stopped. Why? Because the fresh snow is lighter, and it is easier for you to handle. Snow that has been on the ground for extended periods becomes heavy and compacted. You should do a first pass to get rid of the early snow. Then, you can finish the job very easily when the snowstorm is over.


