Metal fastening requires reliable methods. Rivet guns provide permanent connections that face stress and vibration. These tools will be necessary to assemble metal pieces in innumerable ways. The procedure forms powerful connections without the use of welding tools or sophisticated technologies.
Metalwork is very dependent on good fastening. In most cases, rivets are preferable to screws, bolts, and adhesives. The bond is resistant to vibration. Furthermore, rivets distribute stress over a broader area than point fasteners. Projects are completed more quickly than in traditional welding.
Rivet fastening is one of the basic skills of professional metalworkers and DIY fans. The method can be applied to both thin sheet metal and thicker structural components, such as beams and plates. You will master this method through understanding the tools, materials, and proper procedures.
1. Applications and Projects Using a Rivet Gun on Metal
Automotive Repair and Bodywork
Vehicle restoration requires secure metal connections. You attach body panels using rivets when spot welding is not available. The ONEVAN 2.4–5.0mm Cordless Rivet Gun excels in automotive applications due to its consistent force, ensuring clean installations. Trim pieces need fastenings that look professional and hold permanently.
Subsequently, metal bumpers often require repair after impacts. You can reinforce damaged areas by riveting patches or backing plates. Frame components benefit from riveted reinforcements in stress-prone zones. The connections maintain strength while allowing some flexibility in the metal structure.
Additionally, classic car restoration involves replacing rusted sections. Rivets match original manufacturing methods in many vintage vehicles. You preserve authenticity while creating durable repairs. Door skins, fender patches, and floor pan installations all utilize rivet gun techniques.
DIY Metal Fabrication Projects
Creative metalwork opens through rivet fastening skills. Custom sculptures take shape when you join sheets, bars, and decorative elements. Art installations can incorporate visible rivets, enhancing aesthetic appeal and making them integral design features.
Additionally, the industrial aesthetic appeals to many contemporary artists. Then, building metal furniture requires strong joints without bulky hardware. You can construct durable shelving units, stable tables, and practical storage racks utilizing riveted connections that ensure strength and longevity. Furthermore, the finished appearance suits modern interior design preferences.
Finally, garden structures gain durability through proper metal fastening. Trellises, planters, and decorative panels withstand exposure to the weather. Rivets resist corrosion better than many threaded fasteners. You create outdoor pieces that last for years with minimal maintenance.
Aerospace Component Assembly
Aircraft construction relies on both lightweight materials and strong fastening methods to optimize overall performance.
Rivets provide the ideal solution for joining aluminum skin panels. The connections maintain structural integrity under extreme conditions. Weight savings from rivets versus other fastening methods improve fuel efficiency.
In addition, internal components require secure assembly without adding unnecessary mass. Brackets, frames, and mounting systems utilize riveted connections throughout aircraft interiors. Precise alignment can be achieved by utilizing appropriate fixtures while ensuring access for inspection and maintenance.
Subsequently, safety standards in the aerospace industry require fastening methods that are proven reliable. Rivets create permanent joints that resist fatigue from repeated stress cycles. The fastening technique has decades of performance data supporting its use in critical applications.
Metal Roofing and Construction
Commercial and residential roofing uses metal sheets joined by rivets. You connect panels to create weather-tight seals. Guttering systems attach securely to fascia boards through riveted mounting brackets. The connections withstand wind loads and thermal expansion cycles.
Secondly, fabricating metal deck frameworks requires reliable fastening. Riveted joints connect support beams, cross members, and railing posts. Construction sites benefit from the speed of rivet installation compared to welding. You complete the framework assembly efficiently without specialized electrical equipment.
Finally, metal building components arrive as pre-cut pieces for assembly. Rivets enable the field installation of structural systems. Wall panels, roof trusses, and support columns connect using pneumatic or cordless rivet guns. The process suits both professional contractors and owner-builders.
Marine and Boat Building
Watercraft demand corrosion-resistant fastening methods. Stainless steel and aluminum rivets provide durability in marine environments. Hull construction relies on thousands of rivets creating watertight seams. You select rivet materials that match base metal properties to prevent galvanic corrosion.
Similarly, deck hardware installation requires fasteners that resist saltwater exposure. Cleats, rails, and mounting plates attach through riveted connections. The joints maintain strength despite constant moisture and temperature variations. Marine-grade rivets outlast many alternative fastening systems.
Lastly, boat repair involves replacing damaged sections while maintaining structural integrity. You remove old rivets and install new fasteners following original construction patterns. The repairs restore strength without compromising the hull design. Proper riveting techniques, combined with regular maintenance, help ensure that vessels remain seaworthy for many seasons.
Industrial Machinery Manufacturing
Manufacturing equipment uses riveted assemblies for housings and protective covers. You join sheet metal enclosures that protect internal mechanisms. The connections allow for thermal expansion without creating stress points. Maintenance access panels attach with removable fasteners, while structural components use permanent rivets.
The second point is that securing pipes, ducts, and ventilation systems requires reliable metal connections. Rivets handle vibration from machinery operation better than threaded fasteners. You install brackets and supports that maintain position under continuous operation. Industrial environments benefit from the durability of properly installed rivets.
The last point is conveyor systems, processing equipment, and packaging machinery, all of which incorporate riveted components. The fastening method proves cost-effective for high-volume manufacturing. You achieve consistent quality across thousands of identical assemblies.
Metal Signage Installation
Commercial signs require mounting systems that endure weather exposure. You rivet aluminum sign faces to backing frames. The connections remain secure despite wind loads and temperature swings. Mounting brackets attach to building surfaces through combinations of anchors and rivets.
Then, decorative metal signs often feature visible rivets as a design element. The industrial appearance suits many branding aesthetics. You create professional installations that project quality and permanence. Indoor signage applications also utilize riveted assembly for dimensional lettering and logo panels.
2. Selecting the Right Rivet and Rivet Gun for Metal Projects
Types of Rivets Suitable for Metal Projects
Solid rivets represent the traditional fastening method for metal assemblies. These one-piece fasteners require access to both sides of the work. You drive solid rivets using specialized tools that compress and deform the shaft. Aircraft construction commonly uses solid rivets for their superior strength and reliability. The installation process requires more skill than with other rivet types.
Pop Rivets
Pop rivets revolutionized metal fastening through blind installation capability. You need access to only one side of the workpiece. The ONEVAN 20000N Brushless Cordless Rivet Gun handles pop rivets efficiently across various sizes and materials. A mandrel pulls through the rivet body, expanding it against the back surface. The mandrel breaks off at a predetermined force level, completing the installation.
Semi-tubular Rivets
Semi-tubular rivets offer advantages for joining softer metals or dissimilar materials. The partial hole through the rivet shaft requires less installation force than solid rivets. You will find these fasteners in applications that require moderate strength without the complexity of solid rivet installation. Electrical enclosures and light-duty assemblies commonly use semi-tubular rivets.
Spring Rivets
Spring rivets provide adjustable tension during installation. The rivet compresses like a spring, maintaining pressure on the joint. You use these specialized fasteners for applications requiring some movement or flexibility. Applications such as hinges, pivoting mechanisms, and adjustable assemblies benefit from the flexibility and adjustable tension provided by spring rivets.
Factors to Consider When Choosing a Rivet Gun for Metal
Force Capability
Force capability determines the range of rivet sizes a gun can install. You match tool specifications to your largest anticipated rivet diameter. Insufficient force results in poorly set rivets with weak joints. Excess capability adds cost and weight without benefit.
Rivet Diameter
Maximum rivet diameter ratings indicate the largest fastener size the tool accepts. Ensure that the nose pieces and mandrel collection systems are compatible with your rivet dimensions. Some tools offer interchangeable nosepieces for different rivet sizes.
Ease of Operation
Ease of operation affects productivity and user fatigue. You evaluate trigger effort, tool weight, and balance. Controls should be accessible without repositioning hands. Spent mandrel collection systems reduce cleanup time. Quick-change nosepieces speed transitions between rivet sizes.
Performance of Different Rivet Gun Types in Metal Riveting
Manual Rivet Guns for Occasional Use
Manual rivet guns suit occasional use and light-duty applications. You operate these tools by applying hand pressure to the squeeze handles. The physical effort limits continuous operation. Manual guns work well for small projects with limited rivet counts. Cost remains low compared to powered options.
Pneumatic Rivet Guns for Consistent Force
Pneumatic rivet guns deliver consistent force through compressed air power. Professional shops favor these tools for production environments. You achieve faster cycle times compared to manual operation. The tools handle larger rivet sizes with less operator fatigue. Air supply requirements limit the portability of this power source compared to others.
Corded and Cordless Rivet Guns
Electric rivet guns are available in corded or cordless rivet guns. Corded models deliver unlimited runtime with consistent power. You work in fixed locations with electrical access. Cordless rivet guns offer the ultimate portability.
Hydraulic Rivet Guns for High Power
Hydraulic rivet guns generate the highest forces for large-diameter rivets. Industrial applications requiring structural fastening use hydraulic power. You set rivets up to substantial diameters with controlled force. The tools cost more and weigh considerably compared to other types.
Secondly, frequency of use justifies different investment levels. Occasional projects suit manual or basic electric tools. Regular use demands durable construction and comfortable operation. Production environments require industrial-grade tools designed for continuous operation. You should consider the initial cost relative to the expected long-term reliability and productivity.
3. Surface Preparation Before Riveting Metal
Cleaning and Prepping the Metal
Metal surfaces can collect contaminants , hindering effective rivet installation. Rust forms on ferrous metals exposed to moisture. You remove all rust using wire brushes, sandpaper, or chemical rust removers. Surface rust weakens joint integrity by preventing metal-to-metal contact. Deep rust will indicate structural weakness requiring material replacement.
Paint and Coating
Paint and coatings must be removed from rivet locations. You strip paint mechanically or chemically, depending on coating type. Rivets cannot compress properly through paint layers. The coating breaks down over time, creating gaps in the joint. Clean bare metal provides the strongest possible connection.
Debris and Dirt
Debris, including dirt, oil, and manufacturing residues, affects rivet performance. You degrease surfaces using appropriate solvents. Metal cutting operations leave coolant and metal fines, requiring thorough cleaning. Even fingerprints contain oils that should be removed before riveting critical joints.
Mill Scale
First, mill scale on hot-rolled steel creates an uneven surface. You remove mill scale through grinding or sandblasting. The brittle coating flakes off under stress, compromising joint strength. Structural applications demand complete mill scale removal before assembly.
Then, cleaning extends slightly beyond the immediate rivet area. You prepare enough surface to allow for proper clamping and support. Surrounding cleanliness prevents contamination during installation. Final inspection requires visibility of the entire joint area.
Marking and Measuring Rivet Locations
Precise rivet placement ensures proper load distribution and alignment. You measure from reference edges using calibrated tools. Transfer punches create indentations marking exact locations. The marks guide drill bit placement and verify correct spacing.
Rivet Spacing
Rivet spacing follows engineering specifications for structural applications. You maintain consistent distances between fasteners. Too close spacing weakens the metal between holes. Excessive spacing allows joint movement and stress concentration. Standard spacing guidelines exist for various applications and materials.
Edge Distance
Edge distance affects joint strength significantly. Your position is far enough from the edges to prevent tear-out. The minimum edge distance is related to the rivet diameter and material thickness. Structural codes outline specific standards and requirements necessary for safe and reliable applications. Insufficient edge distance causes premature failure under load.
Alignment
Alignment between mating parts requires careful marking on both pieces to ensure a precise fit. You stack materials and mark through both layers when possible. Alternatively, measure and mark each piece independently using a common reference. Misaligned holes prevent proper assembly and create weak joints.
Layout Pattern
Layout patterns depend on joint design and load requirements. You arrange rivets in single rows, double rows, or staggered patterns. Complex assemblies will require detailed drawings showing exact locations. Templates guide repetitive work with multiple identical pieces.
Drilling Accurate Holes in Metal
Drill bit selection affects hole quality and tool life. Cobalt steel bits maintain sharp edges when drilling steel and stainless steel. Titanium-coated bits provide good performance at a lower cost. Carbide-tipped bits handle hard materials and abrasive conditions. You match the bit material to the metal being drilled.
Split Point Drill
Split point drill bit geometry reduces walking when starting holes. The design cuts immediately upon contact without a center punch. You achieve more accurate hole placement, particularly in thin materials. Standard point bits work well with center-punched starting points.
Hole Size
The hole size must match the rivet diameter specifications. You drill holes slightly larger than the diameter of the rivet shaft. Excessive clearance reduces joint strength and allows misalignment. Insufficient clearance prevents rivet insertion. Standard clearances are typically 0.003 to 0.006 inches over rivet diameter.
Drilling Speed
The first thing is that drilling speed affects hole quality and bit life. You use slower speeds for harder metals and larger diameters. High speeds are suitable for soft materials and small particles. Using cutting fluid during drilling operations reduces heat and can improve the finish quality of drilled holes. Proper speed prevents work hardening and premature bit wear.
Then, supporting the workpiece during drilling prevents deformation. You clamp materials firmly to a solid backing surface. Thin sheets require particular attention to avoid dishing around holes. Unsupported drilling creates raised edges and burrs requiring additional finishing.
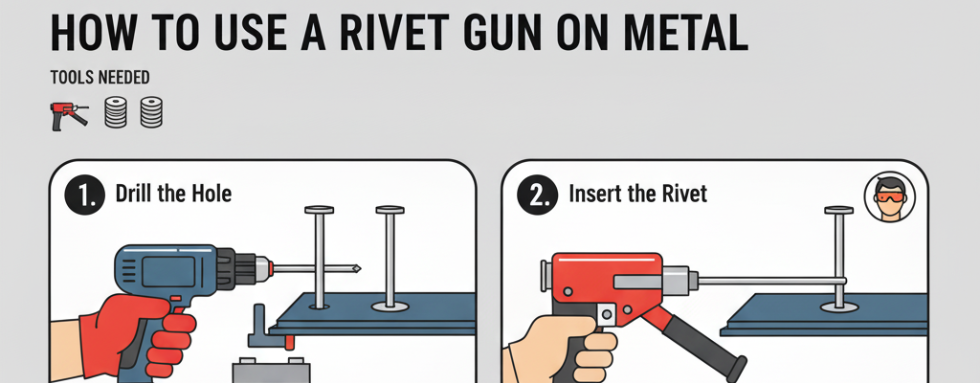
4. Step-by-Step Guide: How to Use a Rivet Gun on Metal
Tools and Materials Needed
It is essential to gather all required equipment before commencing the installation process. A rivet gun suitable for your rivet size and material thickness forms the central tool. Appropriate rivets matching your material and strength requirements wait in organized containers.
Drill with Suitable Bits
A drill with suitable bits creates holes for the insertion of rivets. You include measuring tools such as calipers and rulers. Clamps hold materials in proper alignment during drilling and riveting. Safety equipment protects you from metal chips and mandrel debris. Use safety glasses designed to protect against flying particles during riveting operations. Then work gloves protect hands from sharp edges and metal surfaces.
Center Punches
Center punches mark hole locations accurately. Deburring tools clean drilled holes for smooth rivet installation. A file removes excess material and smooths rough edges. Cleaning supplies, including rags and solvents, are used to prepare surfaces. A workbench or solid support surface provides a stable platform for assembly operations.
Installing the Rivet
You insert the rivet mandrel into the nose of the rivet gun. The mandrel head seats fully in the pulling mechanism. Different rivet sizes will require changes to the nosepiece. Verify that the mandrel fits securely without excessive play. A loose mandrel slips during pulling, resulting in incomplete rivet setting.
Insert the Rivet Through the Pre-drilled Hole
Insert the rivet through the pre-drilled hole from the visible side. You push the rivet body until the manufactured head contacts the surface. Both pieces of metal being joined should sit flush without gaps. Misaligned holes prevent full rivet insertion. Back out the rivet, realign the pieces, and attempt insertion again if resistance occurs.
Position the Rivet Gun
Position the rivet gun perpendicular to the work surface. You hold the tool firmly, with one hand on the grip and the other on the trigger. The nosepiece presses against the rivet-manufactured head. Maintaining this position throughout the pulling process ensures proper rivet formation. Tilting the gun creates uneven compression and weak joints.
Pull the Trigger Steadily
Firstly, pull the trigger steadily with smooth, continuous pressure. The mandrel pulls through the rivet body, expanding it against the back surface. You feel resistance increase as the rivet compresses. Continue pulling until the mandrel breaks at its designed breaking point. The sharp snap indicates that the rivet is completely installed.
Secondly, the mandrel stem collects in the gun housing or ejects from the tool. You regularly clear the mandrel collection chambers to maintain tool function. Some installations require several trigger pulls to complete the riveting process. Maintain steady pressure throughout multiple pulls without repositioning the gun.
Lastly, support the back side of thin materials during riveting when possible. You prevent dimpling or bending from rivet compression forces. A backing plate or dolly provides firm support opposite the rivet gun. Single-sided access situations require careful material selection and rivet choice to minimize backside deformation.
Inspecting the Finished Joint
You examine the manufactured head for proper seating. The head should sit flush against the metal surface without gaps or tilting. Gaps indicate insufficient material compression. The rivet will be too short for the material thickness. Tilted heads suggest misaligned installation or perpendicularity problems.
Check the Back Side
Examine the back side of the rivet installation for quality assurance. The formed head should be symmetrical and fully expanded. You verify that the head diameter meets specifications for the rivet size. Incomplete expansion indicates insufficient pulling force or damaged rivets. Properly formed back heads are smooth without cracks or splitting.
Test joint Tightness
Test joint tightness by attempting to move the joined pieces. You should detect no movement between materials. Loose joints indicate improper rivet selection or installation problems. Structural applications require firm, rigid connections. Some flexibility is acceptable in non-structural assemblies depending on design requirements.
Examine Surrounding Material
The first point is to examine the surrounding material for deformation or damage. For example, you will look for dimpling, cracking, or tearing near rivet locations. Excessive installation force or improper support can lead to structural damage to the materials.
Minor surface marks will be acceptable depending on application requirements. Structural damage requires rivet removal and repair before reinstallation.
Finally, visual appearance matters for visible assemblies. You assess whether rivet heads align consistently and present a professional appearance. Painted or finished surfaces should show minimal damage around rivets. Touch-up finishing will be necessary for cosmetic applications.
5. Common Mistakes and Troubleshooting When Riveting Metal with a Rivet Gun
Using the Wrong Size or Type of Rivet
First, rivet selection errors lead to weak joints or installation failures. You must match rivet diameter and length to material thickness. Undersized rivets lack the strength to handle design loads. Oversized rivets require excessive force and will damage thin materials. Grip range calculations determine proper rivet length for specific applications.
Secondly, material mismatches cause galvanic corrosion in dissimilar metal joints. You avoid aluminum rivets with steel components in corrosive environments. Structural applications require rivets that meet strength specifications. Selecting convenience over engineering requirements compromises safety and reliability.
Improper Surface Preparation
It is crucial to note that skipping cleaning steps will result in contaminated joints. You cannot achieve proper compression through dirt, rust, or paint. The rivet sets poorly, creating weak connections. Corrosion accelerates under improperly prepared surfaces. Investing time in thorough preparation helps prevent future failures.
Lastly, inadequate deburring damages rivet mandrels and bodies. Sharp burrs cut through rivet material during installation. You experience frequent mandrel breaks and incomplete rivet setting. The small effort of proper deburring eliminates these frustrating problems.
Incorrect Rivet Insertion
Firstly, forcing rivets into undersized holes damages the rivet body. You create stress points that weaken the fastener. The rivet will not expand properly during the setting process. Oversized holes allow excessive movement, reducing joint strength. Accurate drilling prevents insertion problems.
Finally, an incomplete insertion leaves gaps between the manufactured head and surface. You must ensure that the seating is full before pulling the mandrel. Gaps create uneven loading and premature failure. Starting installation with an improper rivet position wastes fasteners and requires removal.
Applying Excessive or Insufficient Force
The first point is pneumatic and hydraulic tools can generate forces exceeding material limits. You damage thin materials through over-compression. The metal dimples or tears around rivet locations. Adjustable force settings allow matching the tool output to application requirements. Testing on scrap material helps determine the optimal settings.
Then, an insufficient pulling force fails to expand the rivet body fully. You create loose joints with poor load capacity. Manual tools will lack adequate force for larger rivets. Recognising tool limitations prevents attempted installations that exceed capabilities. Upgrading to powered tools solves force limitations in demanding applications.
Using a Worn or Damaged Rivet Gun
Dull or damaged jaws fail to grip mandrels securely. You experience mandrel slipping during pulling cycles. The rivet sets incompletely or not at all. Regular inspection and maintenance prevent tool degradation. Replacement jaws are available for most professional rivet guns.
Bent nose pieces prevent proper alignment during installation. You cannot maintain perpendicular positioning to the work surface. The resulting tilted rivets create weak, unprofessional joints. Straightening or replacing nose pieces restores proper function.
Not Supporting the Workpiece Properly
First, thin materials require backing support during the rivet installation process. You prevent warping and dimpling by using rigid support. Clamping maintains alignment while absorbing compression forces. Attempting to rivet unsupported thin sheets results in wavy, distorted assemblies.
Secondly, complex assemblies need strategic support at rivet locations. You use temporary brackets or fixtures during initial fastening. Progressive assembly techniques secure one section before moving to the next. Proper support prevents accumulated misalignment across large structures.
Ignoring Safety Precautions
Flying mandrel stems pose a risk of eye injury. First, you wear safety glasses during all riveting operations. Mandrels eject with considerable force when breaking free. Bystanders should maintain a safe distance of at least 10 feet from work areas to avoid injury.
Secondly, sharp metal edges and burrs cut unprotected hands. You wear appropriate work gloves during handling and assembly. Finally, gloves should allow sufficient dexterity to control the rivet gun and position rivets effectively. Cut-resistant materials provide the best protection.
Inconsistent Rivet Quality or Failure to Check the Result
Production work requires periodic inspection of completed joints. Firstly, you verify that installation quality remains consistent throughout the project. Technique drift occurs during extended sessions. Similarly, regular checking catches problems before numerous weak joints accumulate.
Finally, random rivet failures indicate potential installation or material problems. You investigate causes rather than simply replacing failed fasteners. Systematic issues require corrective action to prevent continued failures. Quality documentation helps identify trends and improvement opportunities.
6. Conclusion
Mastering rivet gun techniques for metal opens numerous project possibilities. You achieve professional-quality joints through proper tool selection, material preparation, and installation procedures. These skills are applicable across diverse industries and applications.
Understanding the various types of rivets and their appropriate uses helps prevent installation failures. You match fasteners to specific requirements, considering factors such as strength, corrosion resistance, and accessibility. Surface preparation cannot be overlooked despite time pressures. Clean, properly drilled holes form the foundation for reliable joints.
Practice builds confidence and efficiency with rivet gun operations. You start with simple projects before attempting complex assemblies. Each successful installation helps build confidence in efficient and accurate riveting techniques. Professional results follow consistent application of fundamental principles.
7. FAQ
What type of rivet gun is best suited for working with metal sheets?
Cordless electric rivet guns provide the best combination of power and portability for metal sheet work. You can handle a wide range of sheet thicknesses without an air compressor. Manual guns are suitable for occasional, light-gauge projects. Pneumatic tools are suitable for production environments with established air supplies.
Can I use a cordless rivet gun for thick metal parts?
Modern cordless rivet guns handle substantial metal thicknesses. You verify that the tool specifications match your rivet size requirements. Battery-powered tools now rival pneumatic performance for many applications.
How do I choose the right rivet size for metal?
Rivet diameter should be at least three times the thickness of the thinnest material being joined. You calculate the grip range by adding the material thicknesses and 1.5 times the rivet diameter. This formula ensures adequate length for proper head formation. Strength requirements will dictate larger diameters than the minimum sizing suggests. Engineering specifications override general guidelines for structural applications.
How long does it take to set one rivet with a typical rivet gun?
Installation time ranges from 5 to 15 seconds per rivet, depending on tool type. You complete pop rivet installation with a single trigger pull in most cases. Manual tools require more time due to the repetitive squeezing of handles. Solid rivets need additional time for bucking operations. Experienced operators work faster than beginners through refined technique.
Can rivet guns damage delicate metal surfaces?
Excessive force or improper technique damages thin materials. You protect surfaces using backing plates and controlled force settings. The manufactured head marks metal regardless of the care taken during installation. Cosmetic applications will require paint touch-up or filler. Placing rivets in less visible locations reduces aesthetic concerns. Protective tape is applied around the area to prevent scratches during installation.
How do I remove a rivet from metal if needed?
Rivet removal requires drilling out the fastener. You use a drill bit slightly larger than the mandrel hole diameter. Center the bit on the manufactured head and drill through the rivet body. The head separates, allowing you to punch out the remaining material. Avoid enlarging the original hole unnecessarily. Some specialized rivet removal tools extract fasteners with less damage to the surrounding metal.
What is the maximum thickness of metal a typical rivet gun can handle?
Manual rivet guns can handle combined thicknesses of up to 1/4 inch with the appropriate rivets. Pneumatic tools can manage materials up to 3/8 inch in diameter, depending on the rivet size. Industrial hydraulic guns rivet materials exceeding 1/2 inch thickness. You always check specific tool ratings before attempting installations with thick materials. Multiple thin rivets will be more practical than a single large fastener in applications with extreme thickness.
Do I need to deburr holes before riveting metal sheets?
Deburring is essential for quality rivet installation. You remove sharp edges that damage mandrels and rivet bodies. Burrs prevent proper head seating against surfaces. The process takes seconds per hole but dramatically improves results. Structural and safety-critical applications absolutely require deburred holes. Skipping this step results in weak joints that are prone to premature failure.